The Beginner’s Guide to Online Donations
Get Online Donations with Your Website, Newsletter & Social Media
Nonprofits: Learn how to create a website that includes a logo and a webpage design—and add compelling content, links & photos. Make your nonprofit website look uniquely yours with built-in design tools.
Last week we introduced Chapter 2. Design a Website that’s User Friendly & Google Will Love.
Today we are presenting the full version of Chapter 3 – How to Create a Website – so you can get started adding content to your new site.
Chapter 3.
How to Create a Website: Your Brand, Webpage Design & Compelling Content.
How to Create a Website: Your Brand, Webpage Design & Compelling Content.
Here is a quick summary of the 4 steps in the chapter:
Tab 1. How to Create a Website: Overview of Chapter 3.
Tab 2. Guide 7. Branding: adding a logo and slogan; choosing fonts, colors.
Tab 3. Guide 8. Posting a new webpage. Creating a copy/paste/edit page template.
Tab 4. Guide 9. Adding compelling content, links and photos.
Tab 1. How to Create a Website: Overview of Chapter 3.
Tab 2. Guide 7. Branding: adding a logo and slogan; choosing fonts, colors.
Tab 3. Guide 8. Posting a new webpage. Creating a copy/paste/edit page template.
Tab 4. Guide 9. Adding compelling content, links and photos.
Chapter 3 – How to Create a Website – is set-up for you in the 4 tabs just below.
How to Create a Website: Time Requirement.
- Introduction: 15 minutes.
- Branding: 1 hour.
- Posting a new webpage: 1 hour
- Adding content: 1 hour
Total Time for Chapter 3 How to Create a Website. 2 – 3 Hours. In this chapter you will brand your new website by creating a header with your logo, organizational slogan and by inserting a main menu. You will create your first webpage, and write a master copy/paste/edit page template that you can use over and over again. You will then add content, links and photos to your new page.
Chapter 3 – How to Create a Website – is set-up for you in the 4 tabs below.
Links for How to Create a Website: Your Brand, Page Design & Content:
Overview | 7. Branding Site | 8. Add Pages | 9. Add Content |
CHAPTER 3 OVERVIEW. How to Create a Website: Branding your website, creating pages and page templates and adding compelling content to your new pages.
This week in Chapter 3 we’re going to make your website look uniquely yours with a few easy to use web design tools. We are also going to add a logo, a page, text, links and photos.
Learn More details on how to design a website.
How to Create a Website: Guide 7.
In the first section of Chapter 3, Branding your Website, we will show you how to access the different design tools that you will use to build beautiful pages on your website. We will give you a step-by-step description of how they work and how to use them.
In the first section of Chapter 3, Branding your Website, we will show you how to access the different design tools that you will use to build beautiful pages on your website. We will give you a step-by-step description of how they work and how to use them.
First we will edit the site title for your website and learn about the implications that that has. We will be uploading your logo from your computer to your website, and placing your logo in your header. Will also inserting your slogan into the header and adding your main menu into the header as well. During this process will learn how to create menus, and how to change the size of the fonts on your website. We also learn how to add a sidebar and a footer to your webpage.
How to Create a Website: Guide 8.
The second section will learn the difference between blogs and normal webpages, and actually learn how to create a new page on your website and how to create a page template that you can use and edit over and over again.
The second section will learn the difference between blogs and normal webpages, and actually learn how to create a new page on your website and how to create a page template that you can use and edit over and over again.
How to Create a Website: Guide 9.
In the third section, we’re going to see five different ways that you can add content to your new webpages, plus how to add links and photos. We’re also going to see how to delete a sidebar from one unique page.
In the third section, we’re going to see five different ways that you can add content to your new webpages, plus how to add links and photos. We’re also going to see how to delete a sidebar from one unique page.
Finding Answers to Design Questions.
Finally, were going to learn how to use Google search and the WordPress forum to find answers to questions about challenges that you may have during the development of your website.
Finally, were going to learn how to use Google search and the WordPress forum to find answers to questions about challenges that you may have during the development of your website.
Get Going with How to Create a Website!
So now, click on the second tab to learn all how to personalize your website with a custom header. Click on the third tab to learn all about adding new webpages. And click on the fourth tab to learn about adding content to your new webpages.
Next week, in the next chapter (Chapter 4), we will begin adding volunteer and subscription forms, and learning different ways of collecting online donations.
Enjoy. See you next week.
Back to Links for How to Create a Website: Your Brand, Page Design & Content.
Guide 7. How to Create a Website: Branding your website with your organizational logo, slogan and a main website menu.
Let’s get started developing your website’s header. Adding a site title, logo, slogan, menu and sidebar—and choosing fonts and colors.
Header. The small rectangle at the top of each of your website pages is called the header. Inside of the header you can put a large photograph (Banner or Background Image), the name of your organization, a slogan, a logo (smaller than a banner), a menu or two, ‘like’ buttons, and a search bar—among other things.
One can spend a lot of time creating the perfect header—but if you want to get going with your website—quickly—I’m going to suggest starting with your organization’s logo, your organization’s slogan, and a horizontal main menu.
Over time as you explore the customizing features you will find different ways of adding elements to your header. For example, if you would like to have a background Image in your header, from the customizing menu you can click on ‘Background Images’ and then click on ‘Header’ and select an image. But this is all little bit more advanced and you can work on it easily on your own over time. Today, we’re going start on a few things that will quickly get your header up and running.
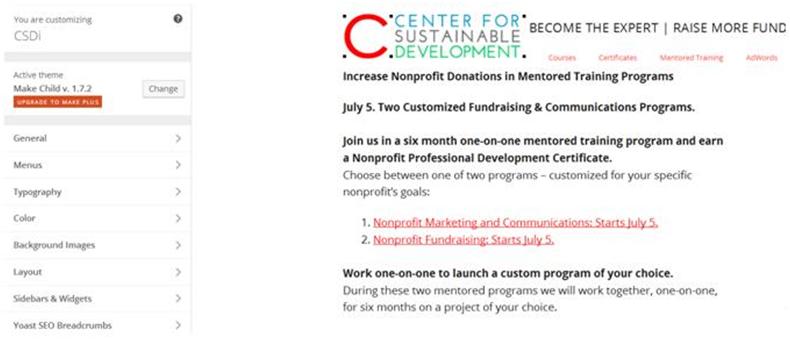
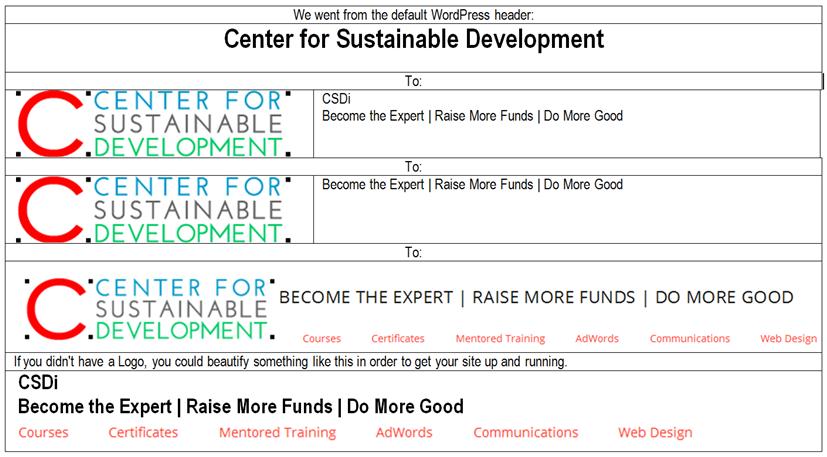
When you open up your website for the first time the header will probably look something like this:
Center for Sustainable Development |
1. CUSTOMIZING YOUR HEADER. So let’s get started customizing your header for you. The first thing to do is to go to your dashboard, click on ‘Appearance’ and then right click on ‘Customize.’ Select ‘Open Link in New Tab.’
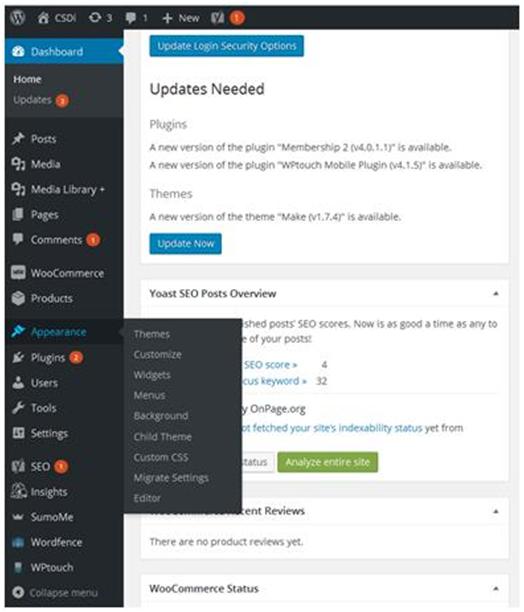
The customizing page will appear:
Now click on ‘General’ and then click on ‘Site Identity.’
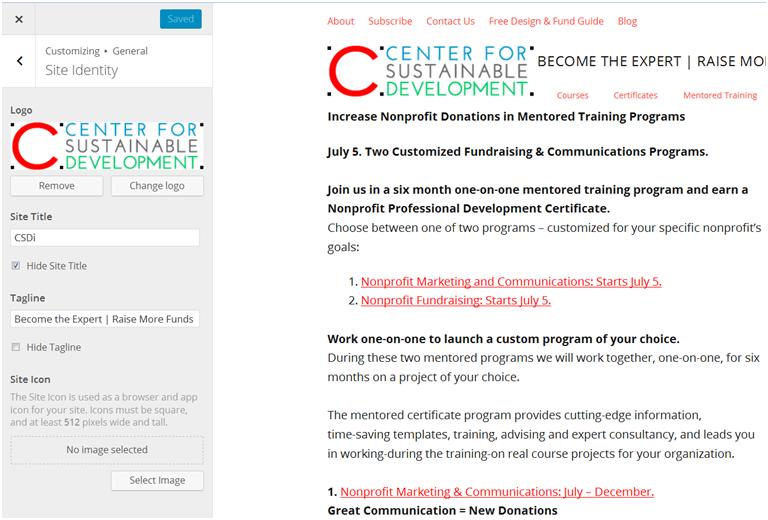
At the top, you can see the logo that we’ve chosen, the site title, and the tagline (which is the same as your slogan).
Uploading a Logo. Chances are, you already have a logo saved in a file somewhere. If you do, from your dashboard, click on ‘Media’ and then ‘Library’ and then in the upper left ‘Add New.’
Click on ‘Select Files’ and you will be taken to where your files are found on your computer. Find your logo, click on it, click on ‘open’, and your logo file will be uploaded to your Media Library.
| Please Note: The goal should be to get a website up and running quickly. If you don’t have a logo, type you organizational name and slogan into the WordPress ‘Site Title’ and ‘Tagline’ to get you started. You can choose a font that will make your header handsome indeed. Work on a sophisticated logo in the future. |
Inserting your Logo. Back in ‘Customizing Site Identity’ click on add logo. You will be taken to the Media Library. Select your Logo and upload it to the Site Identity window.
When you upload your Logo, it might be too big or too small. In Media Library, click on the image. On the left you will see ‘Edit Image.’ Click on it to adjust the size.
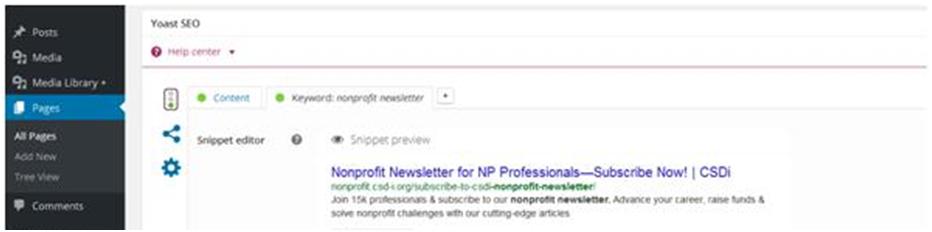
Site Title. If you choose to use the name of your organization, it will appear in the header adjacent to the logo. Do you remember when we worked on ‘Simple SEO’ in Chapter 2? Your site title will also appear as part of your page title in a Google search—and will use up a portion of the available characters that you have (65 characters with spaces). Your site title will also appear in other places—such as in LinkedIn group posts.
If your logo already contains the name of your organization, you might want to consider shortening the site title. So for example, we made the decision to shorten our site title from ‘Center for Sustainable Development’ to ‘CSDi’ as you can see above. This gives us more text space for page descriptions in Google searches: it allows us to be more specific about what the page is about so that people will click on our web page’s link.
So you can simply adjust your ‘Site Title’ right there in the little cell.
But the site title also takes up valuable real estate within your web site’s header. And again, if the name of your organization is in your logo, you might want to reserve space within your header for other things. So you can see that we have clicked ‘Hide Site Title’ and indeed our site title is not appearing in the header.
However, that said, the site title will remain in the Yoast SEO analysis as shown above, and also in your Google search results. It just won’t appear in your webpage’s header.
Tagline. This is also known as your organization’s slogan. If your organization has a short message that it wants to get across, this is where to put it. If you’ve clicked on ‘Hide Site Title’ the tagline will show up in the upper portion of your header adjacent to your logo.
When you’re happy with your logo, site title, and tagline simply hit the blue save button at the top.
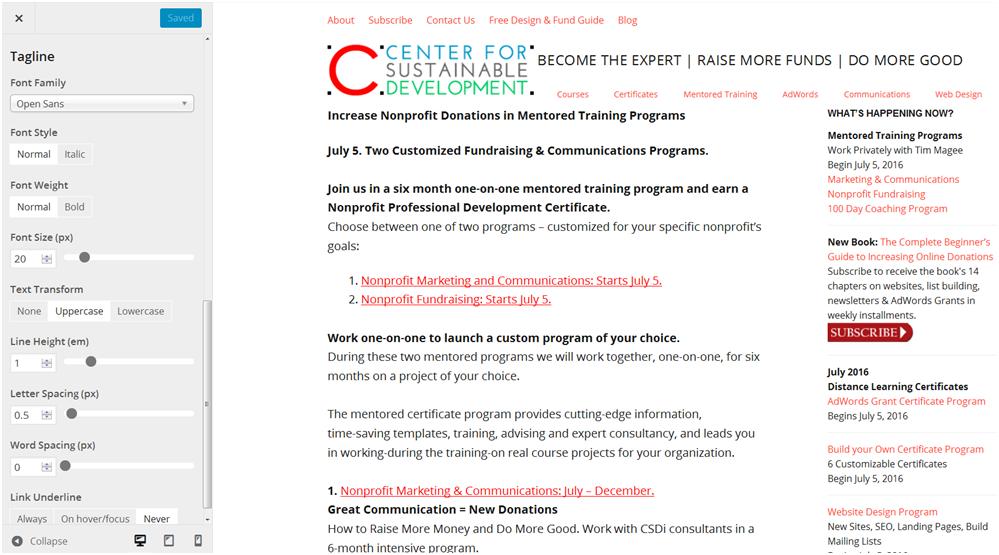
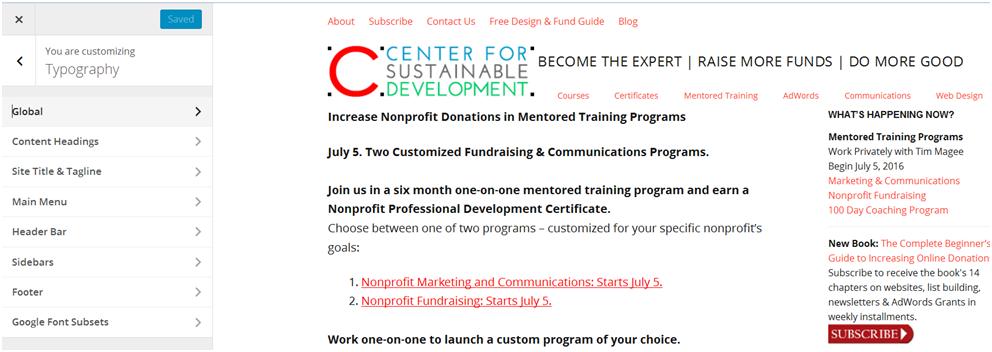
Let’s say that your tagline (slogan) text is too large or too small.
Go back to your Customizing main menu and click on ‘Typography.’ Then click on ‘Site Title & Tagline.’ You will be able to adjust the font and font size so that it will fit just perfectly.
Tech Tool: Since all of this customizing is being done in its own tab, return to your dashboard’s tab, and click on ‘Pages’ ‘Tree View. Right-click on any available page (let’s call it ‘Home) to get a real-time view of what your new header looks like.
As you make little adjustments in ‘Customizing’ you can refresh your Home page to see how the new changes look. Refresh Home Page. Next to its website address you’ll see an arrow in the shape of the circle. Click on that and it will refresh the home page for you.
Adding a Menu to your Header.
Return to your Dashboard’s tab and click on ‘Appearance’ and then on ‘Menus.’
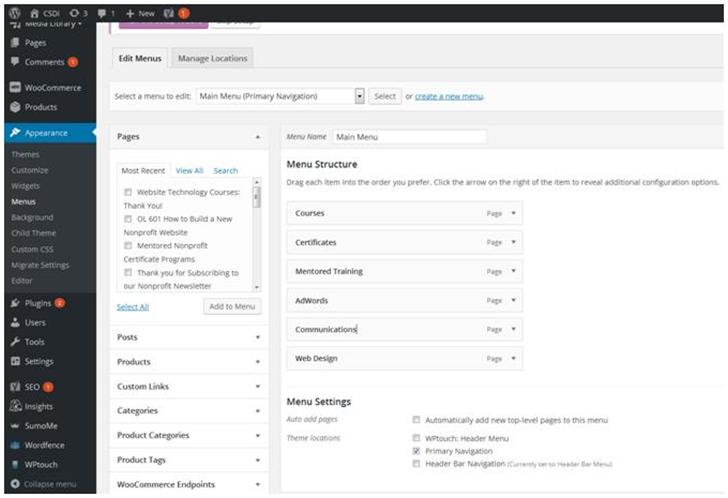
Step 1. In the upper left, you’ll see ‘Select a menu to edit.’ Choose ‘Main Menu.’
Your menu structure will probably be blank. On the left you’ll find a list of pages—perhaps all that you have available are ‘Home’ and ‘Blog.’ You can check one of the little boxes and then say add to menu and it will appear underneath ‘Menu Structure.’ If you click on the down arrow you will be able to change the name in ‘Navigation Label.’ So if your page title is quite long, you can reduce it to a single word that will appear in your menu.
Your first draft menu may only have ‘Home’ and ‘Blog.’ That’s okay. Now that you’ve learned how to do this you can add more pages to it very easily. Click on ‘Save Changes.’
Now, in the upper left click on ‘Manage Locations.’ Make sure it says ‘Primary Navigation’ and that it is assigned to the ‘Main Menu.’ Click on ‘Save Changes’ if you need to.
Your new menu should now appear in your header. If it doesn’t, returned to ‘Customizing,’ ‘Layout’ and then ‘Header.’ Make sure that under ‘Header Layout’ ‘Navigation below’ hasn’t been selected. If it has, select ‘Centered’ or ‘Traditional’ and that should solve your problem.
Header Summary: Let’s look at the progression of what we did:
Please Note: The goal should be to get a website up and running quickly so you can start receiving online donations. Speaking from experience (!) one can spend hours and days obsessing over one’s header. Don’t! Develop it to the point where it looks reasonable. Start working on the rest of your website instead. With a few donations under your belt, you will be able to afford to inexpensively hire a web designer to perfect your header. |
Please Note: Depending on a number of variables such as size and format of your logo, and the theme which you chose, your header might not be looking quite as you’d hoped. My suggestion would be to Google the problem, or go to one of the fora run by WordPress where you can find answers to your questions. At the end of this week’s chapter, I will provide some clues how to do this effectively. |
Sidebars: Sidebars are the subject of much debate. Some people feel that they are a distraction to what is being promoted on the page itself (such as: Donate!).
Sidebars also reduce the width of the main content.
Others fee that that sidebars are an opportunity for new visitors to find more information in areas of their interest (links to subscribe pages, or compelling stories about your work).
You can also put other things in sidebars such as a subscribe form, a search bar, or a list of blog posts.
Never despair! You can turn sidebars on and off for different pages. So let’s say a visitor has found their way to your donation page. The only thing left to do is to pull out their credit card. On this page, a sidebar might be an unwelcome distraction.
But let’s say it is your home page. A sidebar full of delectable nuggets might entice a visitor to stay and explore your site a little longer.
So let’s see how to install a sidebar—and then I will show you how to selectively remove it from specific pages.
Installing a Sidebar.
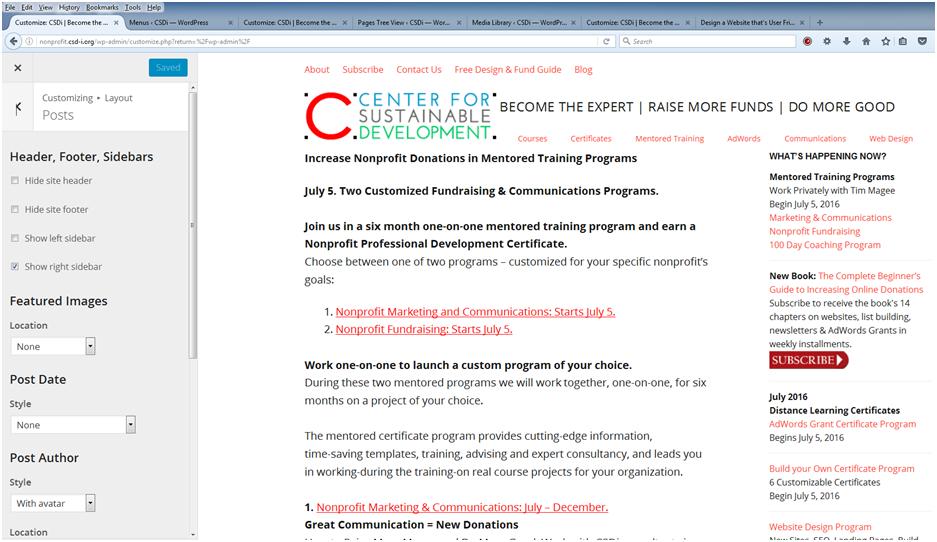
Step 1. Return to your Dashboard tab and click on ‘Appearance,’ ‘Customize,’ ‘Layout’ and then on ‘Posts.’
At the top you can see several options for hiding and showing things. So for example on your blog post you can choose to hide your site header or hide your site footer. You can also choose to show a left sidebar, or right sidebar—or both.
For today click on ‘Show right sidebar.’ Click on ‘Save.’
Tech Tool: If you look at the image below you can see that I have a number of tabs open: the Dashboard, Pages Tree View, a couple of different customizing tabs open, and a typical page that I can refresh to see how changes are working out.
All of this was done by right clicking on a link that I wanted to open and selecting: ‘Open Link in New Tab.’ Now with all of these tabs open, with a single click, and no waiting around for a new page to open, I can go back and forth between different pages to see how changes are working, to make changes, to copy and paste, or to open up an additional page without closing the one that I’m on.
Sidebar in Pages: In the upper left next to ‘Posts’ click the small return arrow.
Click near the bottom of the column on ‘Pages.’ Click on ‘Show right sidebar.’ Click on ‘Save.’
Step 2. Return to your Dashboard tab and click on ‘Appearance,’ and then on ‘Widgets.’
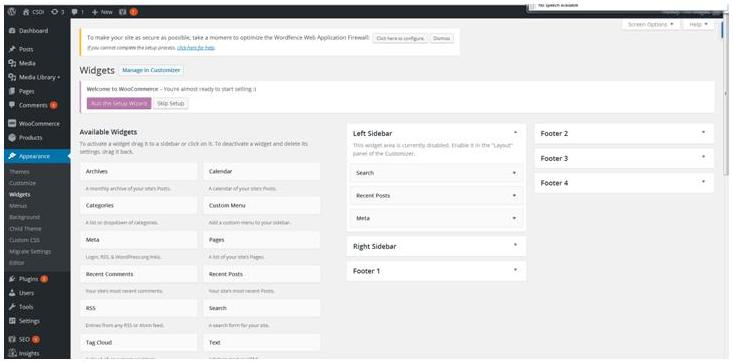
This is very much like with the menu page. First, click on ‘Right Sidebar’ and open it up.
Now over on the left are a number of possible widgets. For example, you can drag a ‘Text Widget’ into the right sidebar. With the text widget you can enter text such as ‘Next Month’s Upcoming Events.’ Beneath that you can type in two or three line items and create links to—for example—a fundraising event.
You can also drag a search widget over into the right sidebar so people can search your website for something specific (golf tournaments!).
You can also drag a widget into the sidebar to show a list of your newsletters or blog posts.
When you’re done adding widgets, click on ‘Save.’
If you want to add text into one of your text widgets, click on the down arrow and add your text into the empty box. I typically add my text into widgets using HTML because there’s much more control over getting an appropriate fit for the space. But we’ll talk more about that later.
Please Note. This is also the place where you can set up a footer at the bottom of your webpages using exactly the same techniques. You would first need to go back to the previous step in ‘Posts’ and ‘Pages’ and uncheck the box next to hide site footer. Then, simply drag widgets from the left into ‘Footer 1.’
Removing sidebars from a specific page or blog post. You’ve already seen that under ‘Posts’ and ‘Pages’ you can elect to have sidebars on your blog posts and elect not to have them on your regular pages.
In the premium, paid version of the theme you’re using, many would have a way to include sidebars or not include sidebars on specific, individual pages. The theme that we’re using today, Make, has this premium option. On our SquareSpace websites we have this option.
However, I’m not going to suggest that you pay for an annual subscription to a premium version of your theme just yet. Let’s get your website up and running and get some donations rolling in first. You may not even need a premium version because frequently there are ‘workarounds’ that you can do to get a desired feature.
Sidebars is one of these. I’m not going to go into this in great detail right here because are going to cover it in the next section. That said, in Make, there is an option for columns. If when adding a new page you opt for a single column, you will not get a sidebar on that page. So if you added, for example, a new donation page for one of your programs, you could decide not to have a sidebar in that page so that donors would not be distracted.
Choosing Fonts and Colors. You have a tremendous amount of control in WordPress over which parts of your website should display fonts in what sizes, in what format, and in what color.
Return to your Dashboard tab and click on ‘Appearance,’ ‘Customize’ and then on ‘Typography.’
You can see immediately how much control you have. ‘Global’ refers to the main content of your website. You can also see that you can customize headings. You can also change fonts in your header bar, your menus, sidebars and footers.
I wouldn’t get too carried away right now. I would be tempted to go initially with the global settings and get the main content of your site the way that you would like to look. You’ll have plenty of time as you begin adding pages and blog posts to make adjustments. Don’t forget, that an adjustment made here under typography, will be reflected throughout your site.
Click on ‘Global.’
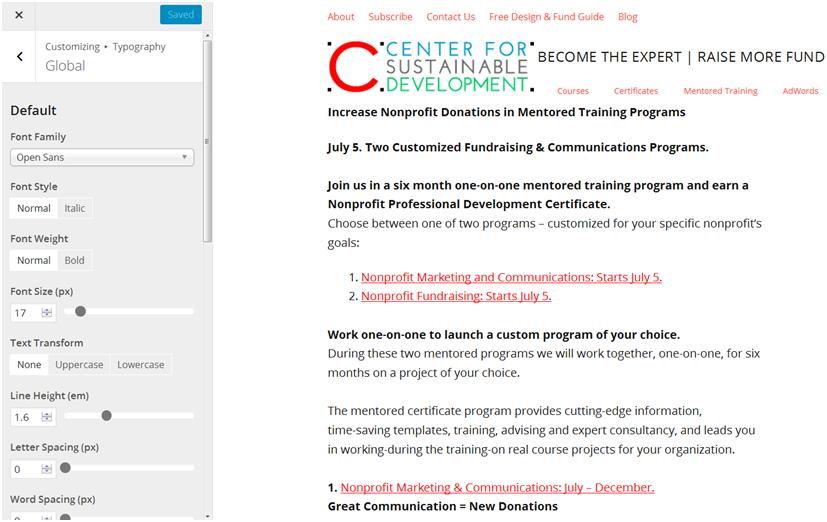
Initially you going to want to choose a font that you like. For now I would choose something simple like an Arial, Helvetica, or as we’ve done ‘Open Sans.’ If in the future you see a font that you really like, it will take 10 seconds to incorporate it on your WordPress site in this Typography section.
For your main content you probably want to stay with a normal font style and font weight. To get started, I would be tempted to go with a 17px font size. This is ‘mobile friendly.’ As your webpages are reduced the size of a smart phone, people will still be able to read them.
The ‘Global’ typography page also allows you to change the fonts for other things such as links and buttons.
Click on Save when you’re done. You can click on the other options within typography and see what’s available there, but I would again recommend moving on with finishing your website. When you have more content posted you will be able to better see what an entire page and its various fonts look like.
If you click on ‘Color’ just beneath ‘Typography’ you will see a similar list of website locations and components that have opportunities for colors.
For now I would be tempted to simply look through the options that are available. These will include the color of headings and titles, and borders and backgrounds. Again, familiarize yourself with what you have the capability of doing, but I would be tempted to keep moving on with the development of your website and come back and do this a little bit of time.
Okay, let’s move on to the next section where we’ll actually be pasting content into pages and talking about developing templates for pages so that your site will have a consistent look and feel. Templates will also make it more efficient to enter content.
So now we had a quick tour of your dashboard and you can see how many exciting things you can do to customize your website. It’s time now to begin focusing on organizing the pages and posts in your website in preparation for adding content.
So click on the next tab called ‘Add Pages.’
Click here to subscribe to our newsletter and receive new chapters on a weekly basis.
Back to Links for How to Create a Website: Your Brand, Page Design & Content.
Guide 8. How to Create a Website: Posting a new webpage and creating a copy/paste/edit master page template.
Blogs versus pages. From one standpoint the content of blogs and pages are the same thing. You add text and photos to a blank page and then you can choose to post it either as a blog or webpage. What’s the difference?
Blogs
Blogs are updated regularly with new articles being posted weekly or monthly. They can be likened to an online journal.
Blogs are updated regularly with new articles being posted weekly or monthly. They can be likened to an online journal.
Blogs are listed chronologically. A visitor can find an interesting blog you’ve posted and then scroll down to find additional posts.
Blogs are interactive. Visitors can leave a comment on your blog, and you can reply to their comments. Visitors seeing that a blog has had 75 comments might be tempted to read it.
Blogs are archived by information that makes them easy to find: date, category, author and tags.
Visitors can subscribe to your blog through something called RSS where each time you post a new blog they receive a notification.
Google likes blogs. Google likes fresh content and rewards fresh content by making the information available to the Internet (indexing) quite quickly.
People follow popular blogs.
Pages
Web pages tend to be a bit more fixed (static). If you write a page on how your food bank works, that page might remain unchanged for a long time.
Web pages tend to be a bit more fixed (static). If you write a page on how your food bank works, that page might remain unchanged for a long time.
Pages aren’t updated regularly, they aren’t organized chronologically, they aren’t interactive, and people don’t necessarily follow fixed pages.
Pages tend to be organized internally by subject matter and keywords.
In Summary: Blogs are a little bit more like a newsletter and pages are a little bit more like background information. Both are important.
So how do they work together?
Let’s use the example of how your food bank works. You might spend considerable time writing a compelling fact sheet about your food bank—and do such a good job at it that it very rarely needs updating—unless there is a programmatic change. Donors like pages like this because they gain confidence in how well run a program is.
Let’s use the example of how your food bank works. You might spend considerable time writing a compelling fact sheet about your food bank—and do such a good job at it that it very rarely needs updating—unless there is a programmatic change. Donors like pages like this because they gain confidence in how well run a program is.
The Blog. A blog can really complement that particular webpage. For example, you could run a series of blog posts that are human interest pieces on the people that are clients of your food bank and on volunteers who work at the food bank. A monthly article like this will paint a well-rounded picture of the good work that your food bank does.
A donor reading a human interest article can then click on a link to make a donation—right on the blog post—or click on a link that takes them to the fixed webpage about how the food bank works. On that page they can learn where the food bank is located, what kinds of food you give out, what days you open and how many people you serve.
By reading the blog and the fixed page, the donor will get to know a unique individual client of the food bank—and then get supporting information about how efficient and successful the food bank is.
The Web Page. The fixed webpage on how the food bank works could have a list of the 12 blogs that were written about people—with a link to each of the articles. So donor visiting the fixed webpage could follow-up by reading a human interest feature about one of the clients—or about one of the volunteers.
Newsletter: A good approach is to have your monthly newsletter linked to your blog post. In other words, you write a blog post about grocery stores that donate food to your food bank. You then write an email newsletter that summarizes the information in a compelling manner that would lead a reader to click on a link that takes them to the blog post—that lives on your website. By doing that, the reader is surrounded by the information in your webpage and can learn more about your organization, how to donate, how to volunteer—and then tell their friends with a ‘Like’ button.
Getting started with posting web pages and blog posts.
Step 1. I want you to pick a subject for 1). A webpage or 2). A blog post. One thing, one subject.
Step 1. I want you to pick a subject for 1). A webpage or 2). A blog post. One thing, one subject.
Let’s be efficient here. These can be things that you haven’t written, but need to write soon, or they can be things that have already been written that were published somewhere else—but you would like to have included in your webpage.
Writing. How to choose what to write about. Let’s face it, we’re all really busy, and it’s difficult to take the time once a week or once a month to write a compelling piece for your blog. On the one hand, motivation is difficult, on the other hand what does one write about? Here’s a Trick. Think of something that your organization needs to do that might need a number of chapters written. Sort of an umbrella concept. The Big Picture. Option 1. It might be an annual report coming up in a few months that needs to have short biographies of nine people associated with your organization. You and your staff could quickly prepare an outline of who the nine people could be. They might all be clients of your food bank: some elderly people, some single mothers, and some homeless people. Here are three categories for which you could find three people each to write compelling stories about. This could become nine short newsletters linked to nine blog posts that are each then linked to from your food bank webpage. In this way you kill two birds with one stone: you get the organization’s annual report done that your board had requested—and you get nine months worth of top quality donor communication. It’s a lot easier to get started writing something when you know it’s going to have greater aggregate value; and that is made up of individual, small pieces that you can get your arms around in one sitting. Option 2. It might be a sales catalog for donors: Sure they want to make a donation, but do they want to donate to your food program, to your water filter program, to your housing program, or to an after school care program? Donors might want to see a range of things in a range of prices so they can make a decision to donate now. You and your staff could quickly prepare a matrix of a dozen things that people could donate towards. $50 will provide fresh vegetables from a local farmer for a family for three months. $25 will provide watercolors for upcoming artists at the after school day care program. $100 will provide paint to repaint temporary housing for mothers in transition. You can then get on with writing about one of these a month—complete with compelling stories and great photos. You can then post them to your blog, send out a monthly newsletter about each one of them, and link to them from your donate page. You wind up with a healthier donate page, a sales catalog to fit any pocketbook, and 12 months of top quality donor communication. Get to Work! Now, with half page outline for either one of these two programs you can sit down on a monthly basis and write up something that’s only three quarters of page or one page long. It just doesn’t take that long to write three quarters of page. |
Step 2. For the purposes of this assignment, you can write something quite short simply for the purpose of learning how to post to the website. Write it.
Think of a temporary, draft title for the page or blog post you’re going to submit to your website.
Determine if you have a photograph or two on the subject matter. If not, make the decision to buy something from the Internet, or send someone out with a camera to take a photo.
Make a list of other pages on your website that this page or blog could link to or be linked from. Are there any pages outside of your website that you might want to link to establish credibility—such as a recently produced study by the state you live in on the efficacy of food banks?
Step 3. You’ve already downloaded the plugin called CMS Tree Page View for your website.
From your dashboard, click on ‘Pages’ and then right-click on ‘Tree View.’ Let’s say that you’re going to write a webpage on your food bank newsletter.
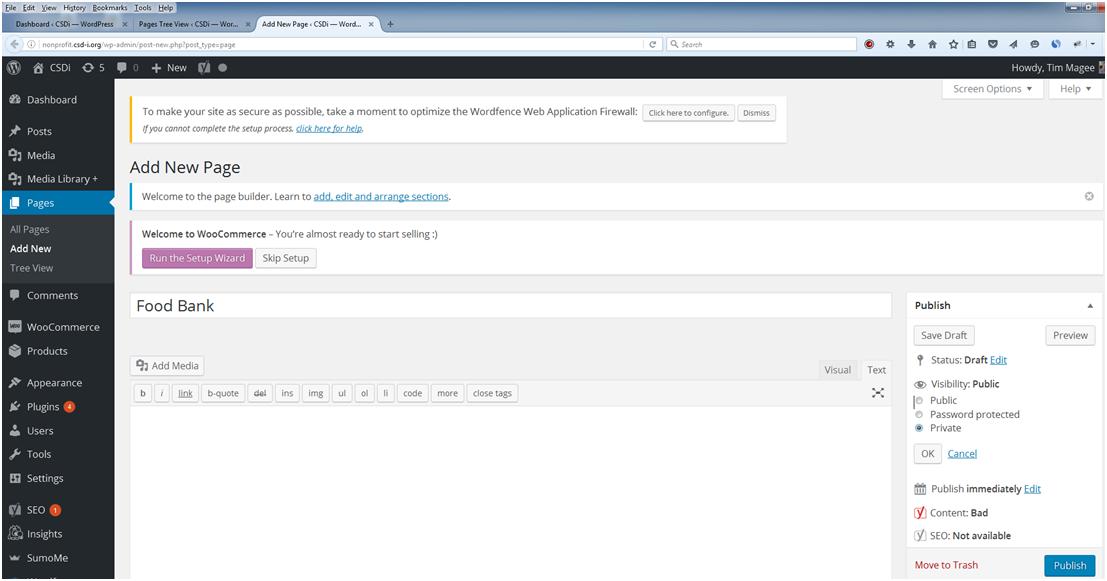
Step 3.a. In tree view, right click on ‘Add New.’ Type Food Bank’ into the page’s title cell.’
Off on the right, click on ‘Visibility,’ ‘Private’ and then click on OK. Then click ‘Save Draft.’ Do not click on ‘Publish.’
Please note that in the screenshot below, I have tabs across the top for my Dashboard, Pages Tree View, and Add New Page. These tabs are all open at the same time because I open them by right clicking on their links and selecting ‘Open Link in New Tab.’ This means that I can go back and forth between the different documents quickly. I also don’t forget where I was a minute ago because I closed the page. I also don’t have to wait for the cycle time of loading new pages.
Just below, you can see that we now have a nice new green button saying ‘Private’ and then ‘Food Bank.’ If you hover your cursor over ‘Food Bank’ a new menu will appear—click on ‘Add New Page After.’
Where it says ‘Enter Title Here’ type in “Subscribe to Food Bank News” as a temporary, draft name for your new webpage.
Make sure that ‘Draft’ is selected and click on ‘Add.’
You will get a new page without content called “Subscribe to Food Bank News.”
Your Tree View will show this:
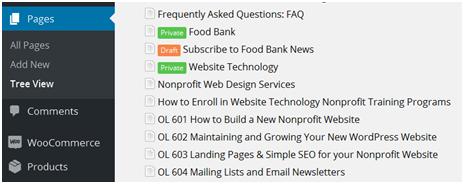
So now, you have a new green folder called ‘Food Bank’ and a draft version of a blank page called ‘Subscribe to Food Bank News’ organized just beneath it.
You now have a nice new page ready to past in content.
If you want to do the same with a Blog Post instead.
Step 1. From your dashboard, click on ‘Posts’ and then right-click on ‘Add New.’
Step 1. From your dashboard, click on ‘Posts’ and then right-click on ‘Add New.’
As blog posts are arranged chronologically, your new blog post will simply be on the top. The process is exactly the same as with posting a new page.
So let’s say that you’re going to paste in one of your nine human interest stories: ‘Church & Food Bank Partner to Provide Lunches to Homeless.’
Paste this into the blog post title as a temporary draft name—and just like with posting a new page click on ‘Save Draft.’ Make sure that you don’t click on publish yet until you have done all of your simple SEO work and edited your content.
So you now have a nice new blog post ready for pasting in content.
Creating a Landing Page Template.
We are going to be talking at length about landing page design in Chapter 5.
We are going to be talking at length about landing page design in Chapter 5.
But this week we’re going to create a very simple web page—just so you can see how to do it.
Unless you already have a webpage template for your organization, you can start this process in Microsoft Word. In Word you can write your copy, add images, and organize and format the look and feel of the page.
Or, you can draft it in WordPress in the ‘Visual’ editing tab.
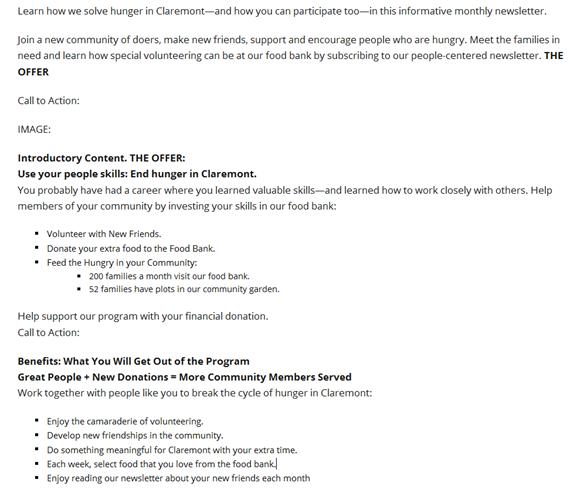
So here’s a very simple annotated (in red) landing page written in Word:
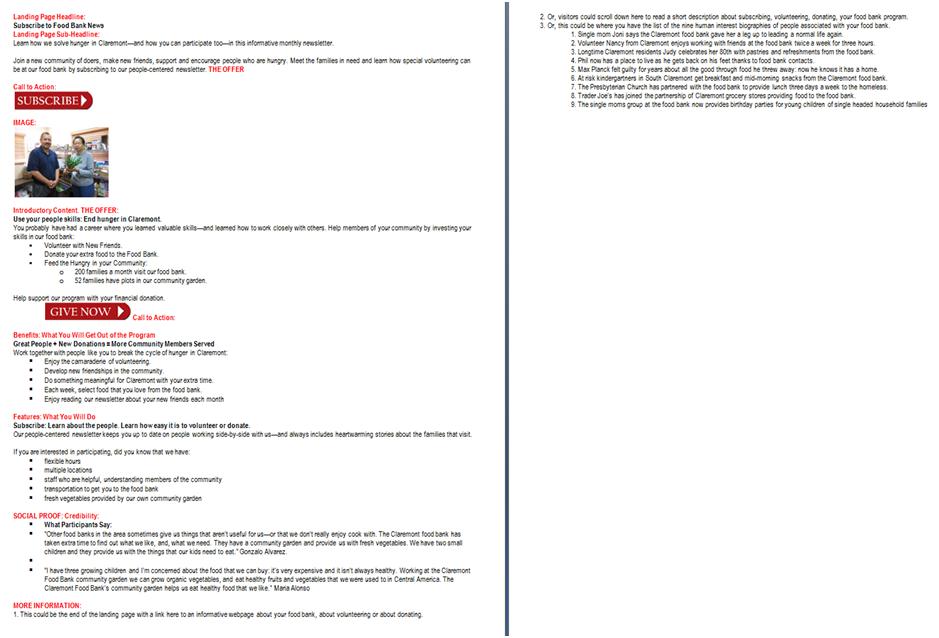
The simple template has:
- a landing page headline
- a landing page sub headline
- an offer
- a call to action
- an image
- introductory content
- benefits: what you will get out of the program
- features: what you will do
- social proof: credibility
- more information
In Chapter 5 we will be looking at the landing page template with a tad more detail.
For today, see if you can’t write something similar to this—even if it’s only one third of its length. Part of this exercise is to begin thinking about developing templates that you can use over and over again.
In the Next Section we will actually paste your content into your new web page. Click in the 4th Tab.
Click here to subscribe to our newsletter and receive new chapters on a weekly basis.
Back to Links for How to Create a Website: Your Brand, Page Design & Content.
Guide 9. How to Create a Website: Five ways to add written compelling content—plus adding photos and links.
There are essentially five ways to add content to a webpage. Try them out and choose the one best for you:
- Open a new page or post, open the visual editor and write just like in Word. All your tools are there.
- Copy/pasting from Word, editing and formatting in the Visual editor (kind of like working in Word).
- Word: converting Word documents into HTML documents for pasting into a new page.
- Templates: copying an existing page that you like and then editing it to become a new page.
- Copy/pasting blocks of text you like from HTML pages into new pages.
I personally use the last two. I almost never do anything from scratch. I either copy one post that I like and rewrite a few things, or I copy several things from several posts that I like and paste them into a new document. The clincher here, however, is that this is by and large done in HTML.
I’m going to show you several examples so you can see the whole process and decide which one might be best for you.
For my first example I’m going to open up the document we created and simply start typing.
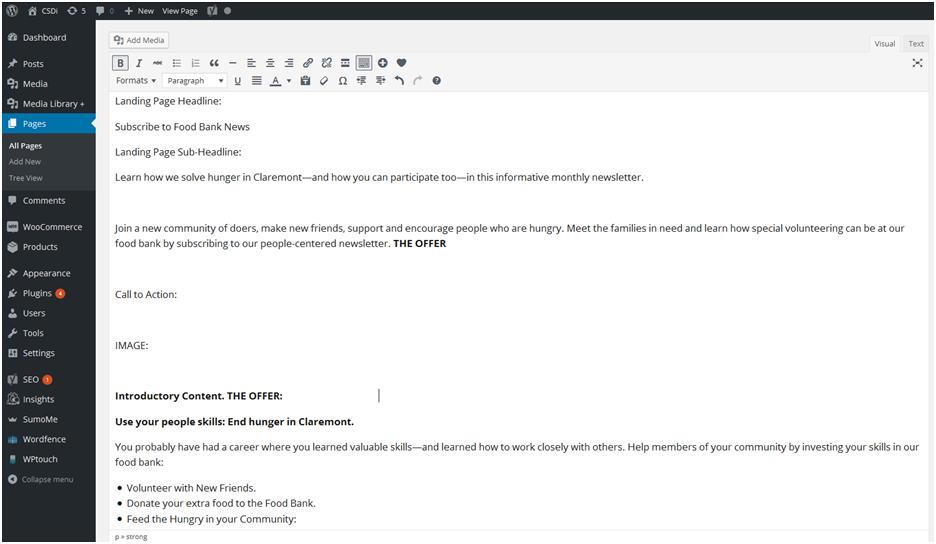
Option 1. Typing directly into the Visual Editor. This is the best and quickest way for a beginner to get their web site up and running immediately. Open up your webpage or blog that you created. On the right, just above the area where you will paste in content, click on ‘Visual.’ Start typing! It is very much like working in Word. All of the same types of formatting tools exist.
For the example below, I simply typed in to the visual editor. I clicked on ‘Add Media’ to add photos from my media storage. Then I made the annotations red and bolded them. And then I added bullets to the lists.
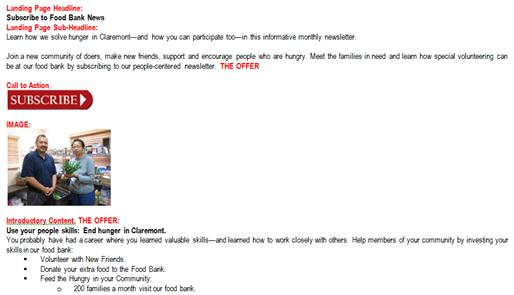
On the right you have what it looked like after I typed the text into the Visual editor and made my formatting changes, and on the left you have the finished page. Just below this illustration I have pasted in an example of what the original Word document looked like. Pretty good, huh?
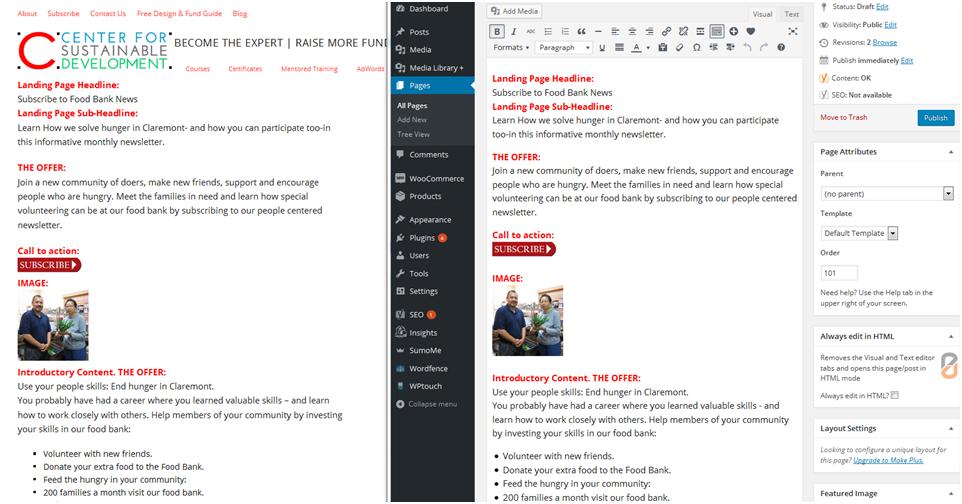
Here is my original Word document. Pretty close match. Bear in mind that all webpages will change the formatting a little:
Option 2. Copy/pasting your Word Document right into the visual editor. This may be a solution for those of us hooked on Word.
Open up your webpage that you created. On the right, just above the area where you will paste in content, click on ‘Visual.
Open your Word document (like the one above, select it all (ctrl a), copy it (ctrl c) and paste it into the blank space in the Visual editor (ctrl v). Edit and format in the Visual editor.
Click ‘Save Draft.’ Scroll up a little bit and right-click on ‘Preview page.’ Looking at the example below, you essentially have all of the text, much of it is bold where it should be bold, and you even have some bullets. However, the line spacing is erratic and you’re missing images.
Easy to Fix: Click on the edit page tab again to go back to the Visual editor. WordPress calls this ‘Visual’, the rest the world calls it WYSIWYG (What you See is what You Get). You can place your cursor within the text and change things—you can change spellings reduce line spacings, bold things, add bullets, add images. You can pretty much do whatever it is that you can do in Microsoft Word.
If you are a real beginner, this is an opportunity to work between a Word document and your webpage in a very simple manner. You will just need to clean up what you pasted in until it looks like what you had hoped for.
Text Tool: Interestingly, where you clicked on ‘Visual’ you can also click on ‘Text’ and see the HTML version of your webpage.
Be sure that you save this as a draft until you’re absolutely ready to publish.
Option 3. Converting Word documents into HTML documents for pasting into a new page. There are programs on the Internet where you can paste the word document into a blank page and it will convert it to an HTML document.
Personal Note: I have been using Word for so many years that it is hard to break the habit: I’m comfortable using it. Plus I have a cache of Word documents that I can borrow from. So this option is a useful one for me. |
Tech Tools: Programs that you can use to do this:
Adobe Dreamweaver (pictured below)
Open Live Writer: a free, open source version of a well-loved but not actively maintained Microsoft Product: Windows Live Writer:
http://openlivewriter.org/
http://openlivewriter.org/
Open Live Writer is like Word for your blog. Open Live Writer is a powerful, lightweight blog editor that allows you to create blog posts, add photos and videos then publish to your website. You can also compose blogs posts offline and then publish on your return. Open Live Writer works with many popular blog service providers such as WordPress, Blogger, TypePad, Moveable Type, DasBlog and many more.
Google search:
“best microsoft word html conversion”
https://www.google.com/?gws_rd=ssl#q=best+microsoft+word+html+conversion
“best microsoft word html conversion”
https://www.google.com/?gws_rd=ssl#q=best+microsoft+word+html+conversion
This search brought up some quickie right-on-the-screen conversion tools:
https://word2cleanhtml.com/
https://html-cleaner.com/doc-to-html/
https://wordtohtml.net/
https://wordhtml.com/
https://word2cleanhtml.com/
https://html-cleaner.com/doc-to-html/
https://wordtohtml.net/
https://wordhtml.com/
There is also a WordPress Plugin: Mammoth.docx converter. 2,000 downloads and 5 stars in reviews.
https://wordpress.org/plugins/mammoth-docx-converter/
https://wordpress.org/plugins/mammoth-docx-converter/
Let’s see what Dreamweaver looks like:
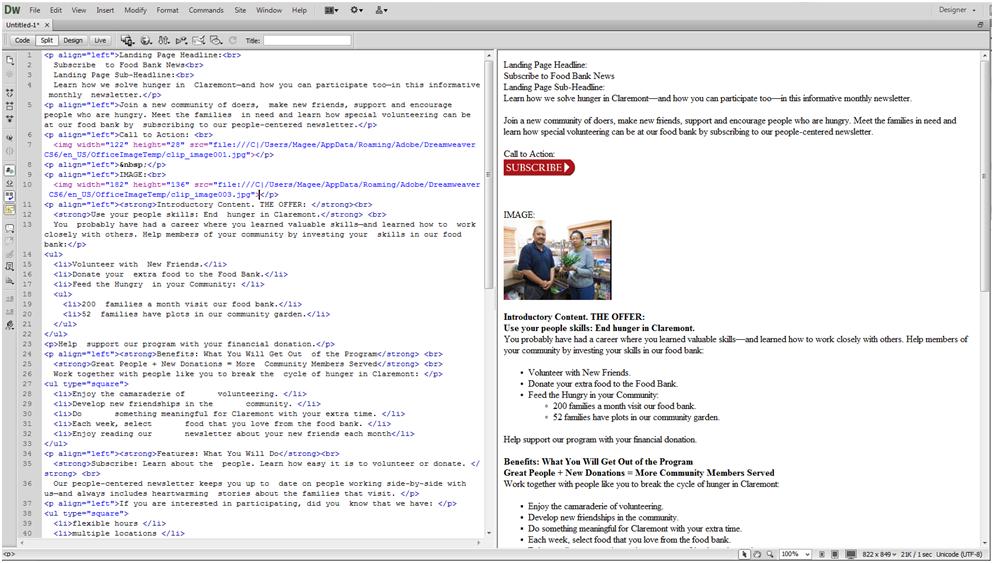
There’s my Word document pasted in on the right and the new HTML conversion on the left. Let’s paste it into the webpage now and see what it looks like. I created a second webpage under the Food Bank heading called ‘Subscribe to Food Bank News html.’
I simply opened up ‘Subscribe to Food Bank News html’ in the edit mode and clicked on ‘Text’ and then copy and pasted the HTML above and pasted it into the Text editor.
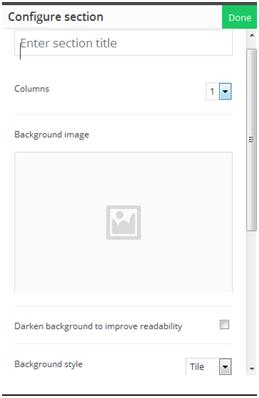
Tech Tool: No sidebar in this version of the webpage. I decided that I wanted to show you what the page looked like without a sidebar. On the right I clicked on ‘Template’ then ‘Builder Template’ than in the upper right I clicked on ‘Columns.’
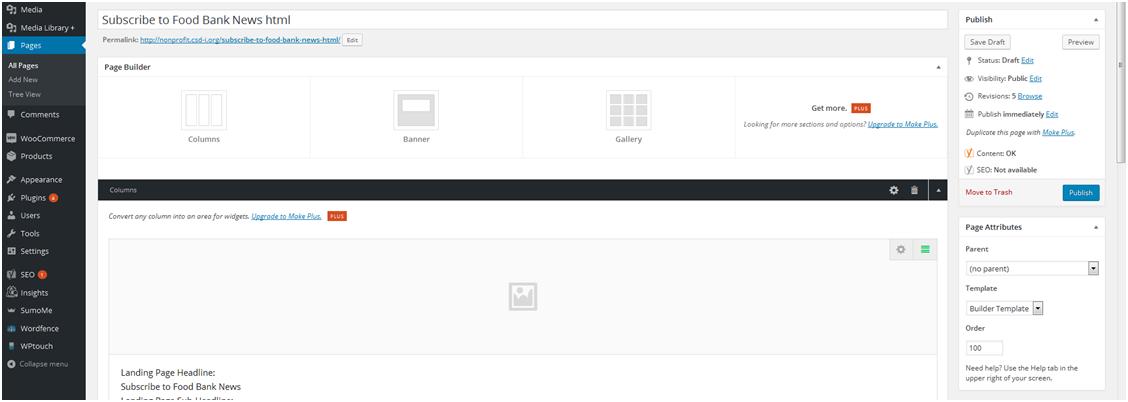
Then in the upper left I clicked on the sprocket and selected one column. Then I pasted in my HTML. This gave me one wide column without a sidebar.
I saved it as a draft and then clicked on ‘Preview This Page’ and this is what I got:
You can see right away that the line spacings and formatting more closely resembles the Word document. It’s still going to take some work. For example the images are missing. However, in the HTML editing page, it shows where to place the images—so that sort of speeds things up.
Without the sidebar, longer sentences don’t wrap around—they have more room. This is especially nice for bulleted lists.
Option 4. Templates: copying an existing page that you like and then editing it to become a new page. Once I get this Subscription page cleaned up, I can use it over and over again as a template. I can just create a new page. Open both this (template) page and the brand-new page in separate tabs using the right-click technique. In the editing mode I can select ‘Text’ for both of them, I can copy the HTML from the Template page and past it into the brand-new page. I can then save the brand-new page as a draft.
I can now open that brand-new page in either the ‘Visual’ or ‘Text’ mode and do my editing. In Visual Edit, just like in Option 1 you can do all of your editing and formatting just like a Word document. In the text edit mode you do your formatting within the HTML code.
Personal note: Many, many people manage successful blogs and websites completely from the Visual editor. A year from now, after you have mastered your website, consider exploring the HTML that you can see in your Text editor. HTML gives you exacting control over a webpage—both in the look and feel, but also in what you can do with a webpage. Embedding volunteer forms, donations, videos, and cutting and pasting between newsletter and blog suddenly become easier and faster. Options 4 & 5 illustrate some of the efficiency gains available when using HTML. |
Option 5. Copy/pasting blocks of text from HTML pages into new pages. In a similar fashion I can find a section of an older document that I like. It might be the way a photograph lines up with some text or it might be a bulleted list. I can then open up a new document and the older document—both of them in text edit mode and simply copy the paragraph’s HTML code from one into the other.
I can borrow paragraphs of HTML code from two or three other documents as well—and place those into the new document—and then save it in draft mode. Now I’ll have a document with some of the best components of several pages that I can then go and edit the content in Visual edit mode or in Text edit mode.
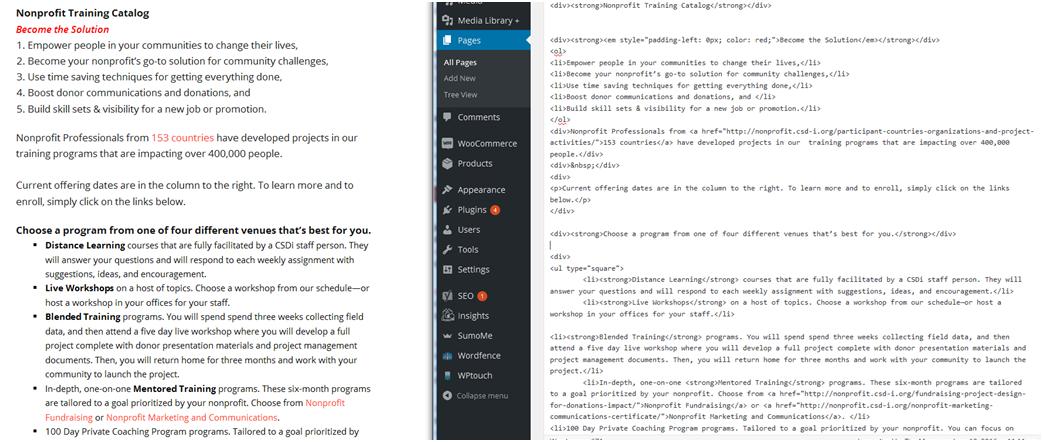
You can see how when placed side-by-side, the finished webpage on the left lines up almost perfectly with the HTML on the right. You can read “non-profit training catalog” in both places. So I can simply copy from the HTML beginning with “nonprofit training catalog” down to just above “nonprofit professionals”, and paste that into another page and get the look of that numbered list.
HOW TO ADD PHOTOS
You’ve actually already done this once in the previous section when you inserted your logo into the header. You worked within the Media Storage Area to upload your logo and then insert it into the header.
You’ve actually already done this once in the previous section when you inserted your logo into the header. You worked within the Media Storage Area to upload your logo and then insert it into the header.
Tech Tool: From your Dashboard, click on Plugins and then Add New. Enter ‘Media Library Plus’ (by Max Foundry) into the search box. Media Library Plus allows you to organize your images in folders. A year from now, when you’ve added 100 images into Media, it becomes increasingly difficult to find the one that you want. Folders really simplify this. Uploading an image into Media Library Plus. Choose a photo from your collection on your computer for your first webpage or blog post. After installing Media Library Plus, from your Dashboard, click on Media Library Plus, and then click on ‘New Folder.’ Type in something like ‘Food Bank’ and click on ‘Create Folder.’ Click on the folder to open it up. Click on Add New’ in the upper left. Click on ‘Browse’ and you will be taken to where your files are stored on your computer. Navigate through your files and find the image for your first webpage. Click on it, click on ‘open’, and your file will be uploaded to your Food Bank folder in Media Library Plus. |
Inserting a photo into your new webpage.. Return to your new webpage in Visual editor mode. Place your cursor in the webpage where you would like to add an image. Click on ‘Add Media’ and you will be taken to your collection of images. Click on the image that you want to insert—and then click on ‘Insert into page’ in the lower right corner. The new image will be inserted where your cursor had been placed. Click on save draft and you’re done.
How to add links. It’s possible with a brand-new website that you don’t have pages to link to yet: All that you have is your first webpage that we’ve just posted. I’m going to suggest that we quickly look for an interesting article on food banks on the Internet, and we can link to that.
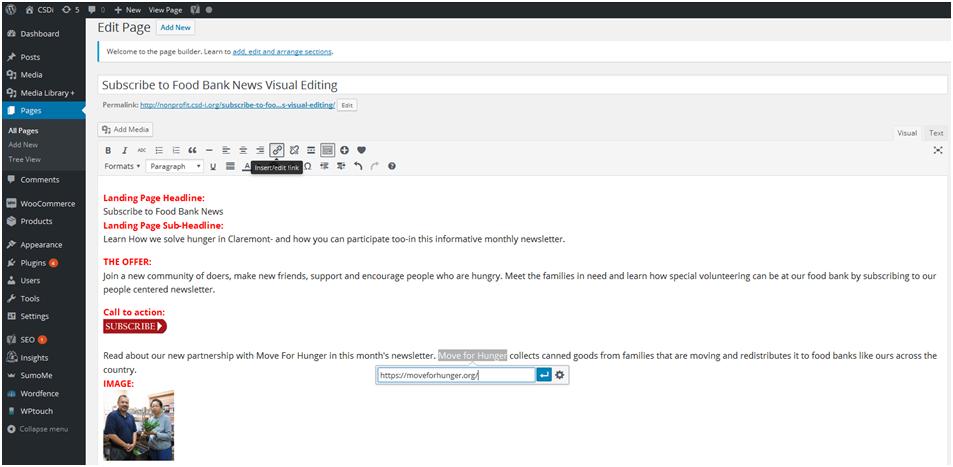
The Claremont Food Bank is forming a partnership with ‘Move for Hunger’ which collects non-perishable food items from families that are moving—and redistributes it to food banks across the country. We feel that our new partnership with Move for Hunger would make a good newsletter article. So let’s link to them.
Open your new page in the Visual editor.
I added this sentence to my new Food Bank Subscription page:
“Read about our new partnership with Move for Hunger in this month’s newsletter. Move for Hunger collects canned goods from families that are moving and redistributes it to food banks like ours across the country.”
“Read about our new partnership with Move for Hunger in this month’s newsletter. Move for Hunger collects canned goods from families that are moving and redistributes it to food banks like ours across the country.”
I went to their website and copied their url:
https://moveforhunger.org/
https://moveforhunger.org/
I then selected ‘Move for Hunger’ in the Visual editor with my cursor. I clicked on the link symbol (Looks like a chain link in the tool bar. It is highlighted in black in the illustration below.). A cell opens up to insert the link—which I did—and I clicked on the ‘Apply’ arrow.
Move for Hunger is now a live link.
Click on ‘Save Draft’ and then right-click on ‘Preview Page’ in the upper left. When the revised page opens, click on Move for Hunger and you will be sent to their website.
BONUS: How to Search in Google and the Forum for WordPress Answers
If in working on your website something isn’t working there are two quick solutions.
Immediate. Search on Google in this format:
wordpress: how do I create a link to a webpage in my blog post?
wordpress: how do I create a link to a webpage in my blog post?
Type this into Google’s search box using this format: WordPress, colon, and then ask your question exactly like you would ask a friend.
You will find that other people have had the same challenges you, and the search results have experts that answer the questions. They typically take a step-by-step approach to answering questions for people.
If you don’t find the answer in your first search—look at how other people are asking the question—they might be using a specific word that you didn’t know about. Ask your question again using this specific word.
A little lead time. The WordPress Forums. The WordPress forums are really good because regular moderators contribute answers to the specific question that you have. They might not respond for a couple of hours or maybe the next morning.
They have specific ways that they like at questions asked. Take a minute to type your question out in Word, and then read through it to make sure it makes sense. It should be short and succinct.
After you’ve written out your question, you’ll need to think of a ‘Topic Title’ which is also short and succinct and gets right to the point.
Finally, you’ll want to provide a link to the page that you’re having the problem on so the moderator can actually look at it.
By using the WordPress forum you’re going to get a customized answer to your very specific need.
There are two forums that you can use.
1. The main WordPress support forum organized by topic:
https://wordpress.org/support/
https://wordpress.org/support/
You’ll need to register with a username and password. You can use the same username and password that you use on your website.
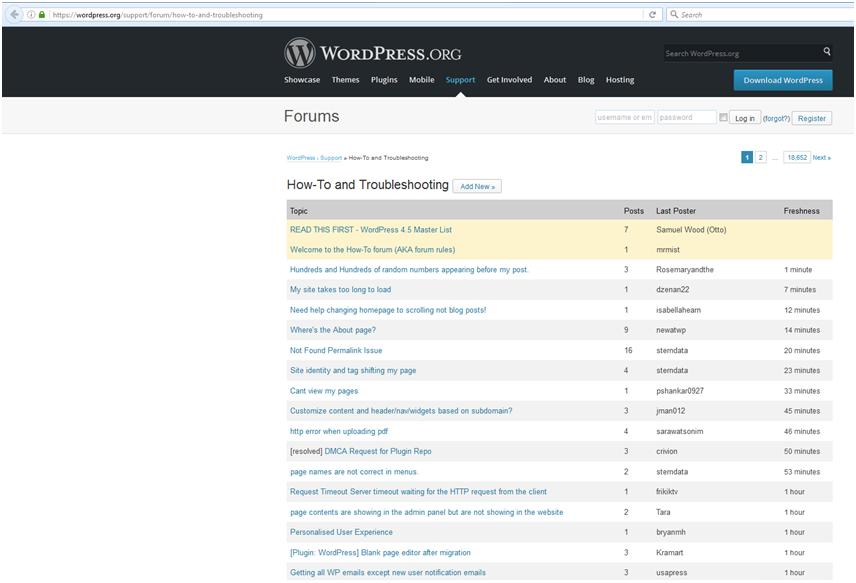
I Typically Use ‘How to and Troubleshooting.’
https://wordpress.org/support/forum/how-to-and-troubleshooting
https://wordpress.org/support/forum/how-to-and-troubleshooting
They encourage you to look through some of the previous posts first to see if your answer might already be there.
If not, click on ‘Add New’ and post a discussion. Before you submit the discussion you have the opportunity to check something that says “Notify me of follow-up posts via email.” That way when someone responds to your question you’ll know immediately.
2. The support forum for your website’s theme:
Themes and Templates
https://wordpress.org/support/forum/themes-and-templates
Themes and Templates
https://wordpress.org/support/forum/themes-and-templates
This is a more technical forum, but it supported by people who actually work for the company that created the theme that you’re using.
To use the example in this course, we used the Theme Foundry’s theme called ‘Make.’ Their forum is here:
https://wordpress.org/support/theme/make
https://wordpress.org/support/theme/make
It works exactly the same way as the main WordPress support forum.
One time saving trick: After I have posted a question on one of the forums, I’ll copy and save the URL of my post.
The reason I do this is twofold.
One, if I happen to have received good advice from a moderator and want to look at it again in the future—I’ll never be able to find that post again. Or it will take a very long time to find it. By saving the URL I can I get right back to that post.
Two, it takes a fair amount of time just to find the forums I like. And again, if I’ve had good success with one of the forums, it can also take a fair amount of time to find that specific sub-forum so that I can post to it again. Part of the reason for this is that I don’t use them that frequently and I forget how to do it six months later.
Just to sum up.
The best option for a beginner is to open up the visual editor in a new page and simply begin typing in your information. You can then format the text and add images.
The best option for a beginner is to open up the visual editor in a new page and simply begin typing in your information. You can then format the text and add images.
You can also paste from a Word document right into the visual editor of WordPress. It will need a little cleanup—but it’s simple to do.
For Word lovers, a Word to HTML converter provides clean HTML code that you can paste into your Text editor in WordPress and gives the best looking version quickly. It will still need a little cleaning up like adding images.
What I probably do more than anything else is to develop a few ‘master’ pages as templates. If it closely resembles a new page that I want to write, I simply copy the HTML from the template, and paste it into the Text editor of the new page. I can then shift over to the Visual editor or Text editor to make changes.
You don’t need to be a professional coder to benefit by using HTML. If you can read your text in a block of code, you can copy a block of text that might have illustrations laid out in a way that you like or to lists laid out in a way that you like, paste it into a new document and edit it like Word in the Visual editor.
So this week, in How to Create a Website, we’ve learned how to brand our site with a logo, slogan, and by choosing attractive fonts and colors. We’ve also learned how to add a new blog post or a new webpage. We then created a template in Word for the first page that we want to paste into our WordPress site. And finally we learned several ways to actually enter text and images into our first web page.
You are done! Now, it’s time to design a website and get busy with the fun stuff. Next week, in Chapter 4, were going to learn a little bit more about formatting pages, and also how to set up simple forms for volunteers or newsletter subscribers, and look at a couple of ways you can collect donations on your site. Will also add a pre-published checklist so that when you click on ‘Publish’ you can rest assured that your new page is perfect!
Super Summary
Click here to subscribe to our newsletter and receive new chapters on a weekly basis.
Back to Links for How to Create a Website: Your Brand, Page Design & Content.
In the next chapter (Chapter 4) we will begin adding volunteer and subscription forms, and learning different ways of collecting online donations.
Enjoy. See you next week.