
The Beginner’s Guide to Online Donations
Get Online Donations with Your Website, Newsletter & AdWords Ads
Ch. 11: How to Apply for a Google AdWords Grant
Did you know Google provides $10k/month grants to nonprofits?
Applying for a Google AdWords Grant: Step-by-step: 1) How to apply for the $10k/month AdWords advertising grant. 2 ) Setting up a simple, sample AdWords campaign to complete the application process. And, 3) past your first sample campaign into AdWords.
 |
The Beginner’s Guide to Online Donations. CSDi is offering a complimentary nonprofit book on online fundraising.
Boost your donations in 14 weeks:  |
|
Each of the 14 chapters include 3 step-by-step guides that lead you in setting up a modern website, launching a donor newsletter program and applying for a $10k/mo Google AdWords Grant. See what the 42 guides include.
|
|
Last week we introduced Chapter 10. Nonprofit Email Newsletters: subject lines, content, layout, launch.
Today we are presenting the full version of Chapter 11 on Applying for a Google AdWords Grant.
Chapter 11. How to Apply for a Google AdWords Grant
Here is a quick summary of the 4 steps in the Google AdWords Grant chapter:
Tab 1. Overview: Did you know Google provides $10k/month grants to nonprofits?
Tab 2. Guide 31. Step-by-step: How to apply for the $10k/month AdWords advertising grant.
Tab 3. Guide 32. Setting up a simple, sample AdWords campaign to complete the application process.
Tab 4. Guide 33. Pasting your first sample campaign into AdWords to complete the application process.
Chapter 11: A Google AdWords Grant is set-up for you in the 4 tabs just below.
Google AdWords Grant: Time Requirement.
- Overview of a Google AdWords Grant: 15 minutes.
- Step-by-step: How to apply. 30 Minutes.
- Setting up a simple AdWords campaign. 1 Hour, 45 minutes.
- Pasting your first sample campaign into AdWords. 30 minutes.
Total Time for Chapter 11: A Google AdWords Grant. Three Hours.
|
Get free access to the Beginner’s Guide to Online Donations here. Each of the 14 chapters includes 3 individual, step-by-step guides to boosting online fundraising: 42 guides in total. See the syllabus.
|
|
Chapter 11: How to Apply for a Google AdWords Grant is set-up for you in the 4 tabs below.
Links for How to Apply for a Google AdWords Grant:
CHAPTER 11. Overview: Did you know Google provides $10k/month grants to nonprofits?
This week in Chapter 11 we’re going to learn about 1) How to Apply for a Google AdWords Grant. 2) Setting up a simple AdWords campaign. And, 3) Pasting your first sample campaign into AdWords.
Guide 31. What is a Google AdWords Grant? Step-by-step: How to apply for the $10k/month AdWords advertising grant.
What is a Google AdWords Grant? $10,000.00 per month in AdWords advertising: Free.
1. Check your nonprofit’s eligibility.
2. Apply to the Google for Nonprofits Program.
3. Apply to the Google AdWords Grant Program.
Guide 32. Create your first sample AdWords advertising campaign to complete the application process.
Setting up and organizing your AdWords Campaign Documents. You’re actually going to write your AdWords campaigns first as Word documents. For a quick start on this first sample campaign, simply use your landing page keywords form Chapter 5.
When you are sure you are completely happy with the final ad, then you can paste them into your AdWords account.
Guide 33. Final Step: Paste your new campaign into AdWords. When you are sure you are completely happy with the final ad, then you can paste them into your AdWords account.
Get Going on your Google AdWords grant!
So now, click on the second tab to learn about what a Google AdWords Grant is and how to initiate the application process. Click on the third tab to learn how to set up a sample campaign. And click on the fourth tab to learn how to paste in your sample in your sample campaign.
Next week, in the next chapter (Chapter 12) we’re going to learn how to organize a structure for campaigns, ad groups, keywords and ads—and then begin writing ads.
Enjoy. See you next week.
CHAPTER 11 Apply: How to Apply for a Google AdWords Grant.
Guide 31. Step-by-step: How to apply for the $10k/month AdWords advertising grant.
Guide 31. Step-by-step: How to apply for the $10k/month AdWords advertising grant.
If your are enrolled in OL 501, please note
Depending on the size of your organization it might take longer than one week to complete the Google AdWords Grant application due to getting permission from your supervisor or finding your 501(c)(3) documents. Don’t worry. Take as long as you need for this process. We won’t actually begin pasting ads into your account until week eight—so you essentially have two months to complete the application process—and it can just be running in the background. If that’s the case, all you need for your week one homework assignment is just a short note letting me know.
Depending on the size of your organization it might take longer than one week to complete the Google AdWords Grant application due to getting permission from your supervisor or finding your 501(c)(3) documents. Don’t worry. Take as long as you need for this process. We won’t actually begin pasting ads into your account until week eight—so you essentially have two months to complete the application process—and it can just be running in the background. If that’s the case, all you need for your week one homework assignment is just a short note letting me know.
Step-by-step: How to apply for the $10k/month AdWords advertising grant.
- What is a Google AdWords Grant? $10,000.00 per month in AdWords advertising: Free.
- Check your nonprofit’s eligibility: https://www.google.com/grants/eligibility/ .
- Apply to the Google for Nonprofits Program.
- Apply to the Google AdWords Grant Program.
Getting started.
Part 1: What is a Google AdWords Grant? $10,000.00 per month in AdWords advertising: Free.
The Google for Nonprofits program provides grants to qualifying nonprofits. Google for Nonprofits will give your organization free access to Google tools like Google Apps for Nonprofits, a mobile fundraising app called Google One Today, and Google Ad Grants. With Google Ad Grants, you can receive $10,000 per month in AdWords advertising to promote your organization’s website, request donations, build your newsletter mailing lists and connect with volunteers. This is a great program because with Google AdWords you can target highly specific people like your ideal donors and connect them to highly specific programs that your organization provides.
Tech Tip: I would prepare for the next three sections by opening up your browser’s bookmark toolbar and create a new folder called "Google Ad Grant." By following the links that I provide below you will also discover new and interesting links that can be useful to you during this process. Save them to your Google Ad Grant bookmark folder using descriptive names so that you can find them again.
Part 2: Check your nonprofit’s eligibility:
https://www.google.com/grants/eligibility/
https://www.google.com/grants/eligibility/
United States. First, you must find out if you’re eligible by following the link above. Simply, your organization must be a non-profit and hold current valid charity status in your country. In the US, that means you must have 501(c)(3) status. There are a few exceptions so follow the link and read through the simple information to find out if you qualify. For example, governmental entities and organizations, hospitals and medical groups, schools, childcare centers, academic institutions and universities are not eligible for Google Ad Grants, but philanthropic arms of educational institutions are eligible. So check.
|
International. Google works with more than 20,000 nonprofits across more than 50 countries. In order to qualify for a Google Ad Grant outside of the United States, your nonprofit must be based in one of the countries listed on the eligibility web page and meet their requirements.
https://www.google.com/grants/eligibility/ |
Once approved, there are also things that you must maintain on a regular basis in order to stay qualified. For example, one qualification is that your ads can only link to your nonprofit’s main website domain that was approved in your initial application (sub-domains are allowed).
Part 3: Apply to the Google for Nonprofits Program.
The application process is a two-step process in the United States which can happen very quickly. Essentially, you fill out a simple online application form (follow the link just below) which Google for Nonprofits will then review. Within a day or two they will contact you and may ask you to send a scanned copy of your government approval letter for your nonprofit status. Upon approval of your application they will send you an email confirmation. I would suggest saving that email somewhere where you can retrieve it easily—and I would also copy the entire email including the "To, From, and Subject Line" sections into a Word document. Save this somewhere safe where you can easily retrieve it if needed—and also print it out and stick it in your new AdWords file.
The application process is a two-step process in the United States which can happen very quickly. Essentially, you fill out a simple online application form (follow the link just below) which Google for Nonprofits will then review. Within a day or two they will contact you and may ask you to send a scanned copy of your government approval letter for your nonprofit status. Upon approval of your application they will send you an email confirmation. I would suggest saving that email somewhere where you can retrieve it easily—and I would also copy the entire email including the "To, From, and Subject Line" sections into a Word document. Save this somewhere safe where you can easily retrieve it if needed—and also print it out and stick it in your new AdWords file.
United States. Start the process here:
https://www.google.com/nonprofits/join/
https://www.google.com/nonprofits/join/
Part 4: Apply to the Google AdWords Grant Program.
Once your application for the Google for Nonprofits program has been approved then you can begin signing up for the products which they offer here:
https://support.google.com/nonprofits/?rd=1#topic=3247651
Once your application for the Google for Nonprofits program has been approved then you can begin signing up for the products which they offer here:
https://support.google.com/nonprofits/?rd=1#topic=3247651
1. To start the Google Ad Grant process, you first need to log in and create an AdWords account here:
https://accounts.google.com/ServiceLogin?service=adwords&hl=en-US<mpl=signup&passive=false&ifr=false&alwf=true&continue=https://adwords.google.com/um/SignupToken&app=Signup&sacu=1
https://accounts.google.com/ServiceLogin?service=adwords&hl=en-US<mpl=signup&passive=false&ifr=false&alwf=true&continue=https://adwords.google.com/um/SignupToken&app=Signup&sacu=1
Choose USD as your currency—even if you’re from a country other than the US.
Be Careful: This is the same account set-up process that a business uses—so DO NOT enter the credit card information required for businesses as you will use your Google AdWords Grant for payment instead. If you do enter credit card information, you will be setting up a business account—and will need to start all over again to create your nonprofit account.
Follow this very well done guide for detailed instructions:
http://static.googleusercontent.com/media/www.google.com/en/us/grants/pdf/external-nonprofit-guide-2014.pdf
http://static.googleusercontent.com/media/www.google.com/en/us/grants/pdf/external-nonprofit-guide-2014.pdf
2. Create your first campaign to continue with the application process. This is a little out of sequence with this training course as we will be developing your first campaign over several weeks. This is just a sample campaign to show Google. By the time your nonprofit AdWords account has been approved you will be ready to post the real campaign that you develop in this course.
Pages 10 through 14 in the guide shows you exactly how to create your first campaign for the purposes of the review process:
http://static.googleusercontent.com/media/www.google.com/en/us/grants/pdf/external-nonprofit-guide-2014.pdf
http://static.googleusercontent.com/media/www.google.com/en/us/grants/pdf/external-nonprofit-guide-2014.pdf
This first campaign should be extremely simple. Google wants to make sure that can develop your first campaign—and they probably also want to see that you’re not promoting something that falls outside of the grant guidelines.
That said, you now need to wait for Google to approve your AdWords Nonprofit account. This could take up to a month—but will probably be quicker than that. It’s during this approval process that we will be developing your first "real" campaign in this course for your organization. Upon confirmation of your acceptance into the Google AdWords Grant program, you will then be able to begin posting real campaigns to your new AdWords nonprofit account.
Looking into the future.
Make sure you continue to comply with all of the Google Ad Grant requirements in order to maintain your grant for the long-term.
Make sure you continue to comply with all of the Google Ad Grant requirements in order to maintain your grant for the long-term.
This is what they say on their webpage:
https://www.google.com/grants/eligibility/
https://www.google.com/grants/eligibility/
Here’s how to stay qualified.
To maintain your eligibility for Google Ad Grants, your organization must:
To maintain your eligibility for Google Ad Grants, your organization must:
- Link your ads to one (and only one) website domain, which should be the same one that was approved in your initial application.
- Actively manage your AdWords account by logging in once a month and making at least one change to your account every 90 days.
- Your ads and keywords should match your organization’s programs and services.
- Strictly commercial advertising is prohibited. If you’re promoting products or services, 100% of the proceeds must go directly to supporting your program.
- Your ads must not link to pages that are primarily composed of links to other websites.
- Your ads may not offer financial products (like mortgages or credit cards), nor can they request donations of cars, boats, or other property.
- Your site can’t display Google AdSense ads or affiliate advertising links.
CHAPTER 11: How to Apply for a Google AdWords Grant.
Guide 32 – 1st Campaign. Setting up a simple, sample AdWords campaign to complete the application process.
Guide 32 – 1st Campaign. Setting up a simple, sample AdWords campaign to complete the application process.
PLEASE NOTE: You should have completed Chapters 5, 6 and 7 before beginning Chapter 11. This will help you target your market in order to write your ads.
Create your first AdWords advertising campaign.
Part 1. Setting up and organizing your AdWords Campaign Documents
You’re actually going to write the ads for your AdWords campaigns first as Word documents. When you are sure you are completely happy with the final ad, then in Guide 33 you can paste them into your AdWords account.
Part 1. Setting up and organizing your AdWords Campaign Documents
You’re actually going to write the ads for your AdWords campaigns first as Word documents. When you are sure you are completely happy with the final ad, then in Guide 33 you can paste them into your AdWords account.
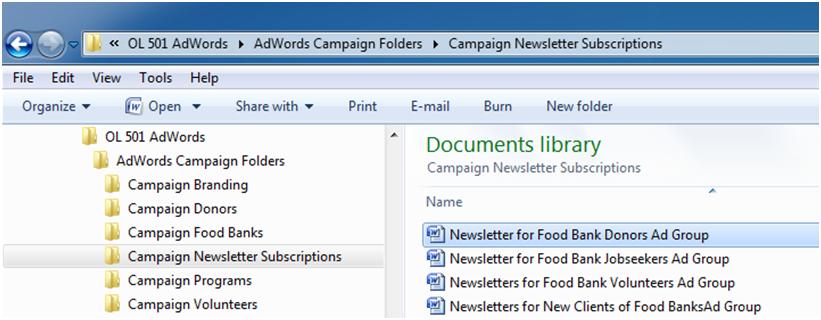
1. So the first thing that I’m going to suggest you do is to open the program that you use to organize your files and folders on your hard drive; in my case it’s Windows Explorer.
2. Create a new folder Called "AdWords Campaign Folders."
3. Inside of that folder create a new folder with the name of your first campaign that you’re going to develop in this course. In my case I’m calling it "Campaign Newsletter Subscriptions." Newsletter Subscriptions will also be the exact name of the campaign that I set up in my AdWords account.
4. Open up this week’s example Word document template "Chapter 11 Ad Group Template with Food Bank Newsletter Ads and Keywords" and save it under the name of the first group of ads you hope to develop for this series of assignments. In my case it’s called "Newsletter for Food Bank Donors Ad Group." I saved it in the folder "Campaign Newsletter Subscriptions."
The structure of folders looks like this:
Part 2. Developing your first group of ads this Campaign.
AdWords has a very specific hierarchy: individual ads are nested within Ad Groups, and Ad Groups are nested in Campaigns. So this is how both my Word documents are organized—and also how my AdWords account will be organized:
Your Account
AdWords has a very specific hierarchy: individual ads are nested within Ad Groups, and Ad Groups are nested in Campaigns. So this is how both my Word documents are organized—and also how my AdWords account will be organized:
Your Account
- Campaign: Newsletter Subscriptions
- Ad Group: Newsletters for Individual Donors for Food Banks
- Ads: the ad that we will write this week for this assignment is included Ad Group template:
- Support a Claremont Food Bank
- Keywords
So simply add the name of your campaign and the ad group to the Ad Group as I’ve done—and today’s date.
Part 3. Paste in your keywords from your landing page research in Chapter 5. Go back to your Excel spreadsheet from Chapter 5 and copy and paste your favorite keywords that you found from your landing page research right over the top of my keywords in this week’s Word document of the example campaign. Here is my Excel example keywords from Chapter 5.
Advanced Tip: Each ad group holds the keywords for its individual group of ads. It’s best to keep keywords unique to each ad group. If you have duplicate keywords in different ad groups Google AdWords won’t know which one would be the best one to select—and in a funny way you will be competing with yourself.
So you can see that I copied in the keywords that I discovered in my research for potential donors into two columns of the table. I’ve made the decision that the first column is specific to donors and I will keep them for this ad group. The other keywords are more general and could be very useful and my other three ad groups for volunteers, new clients and job-seekers—so I’m not going to use in this ad group and save them for the others.
You’ll see that some of the keywords are really very similar and that’s because people might on the one hand type in ‘food bank’ and on the other hand might type in ‘food banks’ so you want to make sure that you have both.
Also, some of my keywords are only one or two words, and some of them are longer: 3, 4, and 5 words. One and two word keywords might be very competitive—and therefore expensive and might be more than our two dollars limit. The 3, 4, and 5 word keywords—known as longtail keywords—won’t be as competitive and will be more affordable for us. So a mixture is a good idea to start with so you can see how they perform you can adjust later.
I also wouldn’t recommend more than 20 keywords initially. After you’ve run your first ad group for a few weeks you can begin to see which keywords are working and which aren’t. If you only have 20 keywords you have some pretty simple editing to do; more than 20 keywords can make the decision making much more complex.
Advanced Tip: Google AdWords will send you notifications in the upper right corner of your account saying things like: "Increase your click through rate. 37 suggested keywords for your ads. Just click here to automatically add these keywords."
Don’t do it!
First, you will wind up with so many keywords that it will be very hard to make decisions on fine-tuning (optimizing) an ad group. Of course AdWords wants to increase your click through rate because that’s how they make money. So absolutely, those additional keywords might get you more clicks—but are they the clicks that you’re hoping will lead potential supporter towards your website?
"Dallas Food Bank News" might actually lead an interested supporter to your website to sign up your newsletter (your goal) whereas these keywords actually suggested by AdWords might not: "food shelves, food giveaway, food vouchers, banks, bank food." You might get clicks—but maybe not subscribers. So spend your clicks on things that will help you reach your goal.
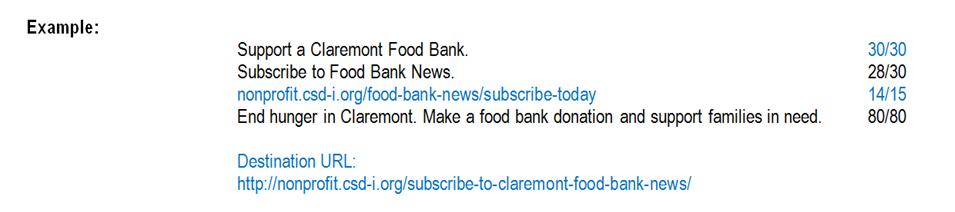
Part 4. Learning the structure of an individual ad.
Headline 1: 30 characters
Headline 2: 30 characters
Description: 80 characters
Display URL Two at 15 characters each: nonprofit.csd-i.org/15-characters/15-characters
Destination (final) URL this isn’t visible but can be: 2048 characters
Headline 1: 30 characters
Headline 2: 30 characters
Description: 80 characters
Display URL Two at 15 characters each: nonprofit.csd-i.org/15-characters/15-characters
Destination (final) URL this isn’t visible but can be: 2048 characters
Your destination URL will be linked to the headline that people click on. You can write a display URL to be descriptive about where they will be led to when they click on the headline: in other words it doesn’t need to be the destination URL it can be more descriptive and compelling.
Part 5. Write your first example ad using targeted keywords from your list of keywords.
Writing your first ad will be a combination of creativity and effective use of keywords that you researched last week.
Writing your first ad will be a combination of creativity and effective use of keywords that you researched last week.
Remember: AdWords will connect your ad’s keywords to what a customer is entering into a Google search. So be creative in using some of your keywords in the ads copy. And also be creative answering questions that a customer may have. Be sure to use a call to action.
So write your first ad now. Using your keywords and your creativity just type right over the top of my example ad. Check your character count.
Action: Write your first ad. You may want to play around with a couple of versions. Get away from it for a day and then look at it again.
CHAPTER 11: How to Apply for a Google AdWords Grant.
Guide 33 Pasteup. Paste your new ad into your Google AdWords Account to complete the application process.
Creating your new AdWords group and paste in your ads.
Simply log on to your AdWords account, select the campaign in the left column that you want to add the new ad group to. You should have created a sample campaign in Chapter 11’s guide 31.
Simply log on to your AdWords account, select the campaign in the left column that you want to add the new ad group to. You should have created a sample campaign in Chapter 11’s guide 31.
You can use the sample campaign for setting up a new ad group and then pasting in your new ad and keywords by following instructions below. If you don’t like the sample campaign that you created as part of the application process you can simply create a new campaign by checking on the red ‘+’ campaign button. If you don’t want to re-enter all of the settings the other things you can do is to check the little box to the left of your campaign name and go edit ‘copy’ and then edit ‘paste.’ This will maintain your settings and then all you need to do is to edit the name of the campaign, and the ad groups—and then paste in your new ads.
The same thing for a new ad group. If you don’t want to have to set up the settings again check the box next to one of the other ad groups that has similar attributes (extensions, time, geography) and click on copy.
On click the little box. Click again on the campaign just be double sure click on edit and click on paste. The message will come up saying do you want to pause this new ad group aft we pasted in. Say yes.
Open up your ad group Word document again. Double check that you’re happy with the ads. Double check that your destination URL is correct by copying it and pasting it into a search page.
Pasting in ads.
Step one. Copy the title of the new ad group from your Word document. Click on the old title of the new ad group and paste in the new title. Save it.
Step one. Copy the title of the new ad group from your Word document. Click on the old title of the new ad group and paste in the new title. Save it.
Step two. Click on one of the ads to open it up for editing (it will double check this is really what you want to do) and then simply copy and paste from your ad group word document the:
- destination URL
- title 1
- title 2
- visible URL
- your ad description
AdWords will give you a visual of what your ad is going to look like both on a mobile device and on a desktop computer.
Double check that everything is correct and that everything was pasted in appropriately and matches your ad—and click on save.
Do that with your other two ads as well.
Now, click on keywords. And click on edit/remove.
Go to either your Word document or your Excel spreadsheet for this ad group and select the column of keywords to be used in your AdWords campaign.
Click on the ‘+’ sign next to keywords and paste in the new keywords and click on save.
If you really want to be safe, you can click on your new ad group. The top click on add extensions and determined that you did indeed the add extensions that you hope to use for this ad group.
If you want to be even more safe, and click on settings and make sure that your ad is running at the right time and in the right location and in the right languages.
You’re done!
In Summary: In this sixth week, you will compile your first ad and its keywords for your first AdWords campaign.
Copyright © 2016, Tim Magee
Next week, in the next chapter (Chapter 12) we’re going to learn how to organize a structure for campaigns, ad groups, keywords and ads—and then begin writing ads.
Enjoy applying for your Google AdWords Grant. See you next week.
Want to enjoy the Chapter 11 AdWords learning process with a live teacher? See the online, teacher-led course behind this chapter.
|
Get free access to the Beginner’s Guide to Online Donations here. Each of the 14 chapters includes 3 individual, step-by-step guides to boosting online fundraising: 42 guides in total. See the syllabus.
|
|
Copyright © 2016, Tim Magee