
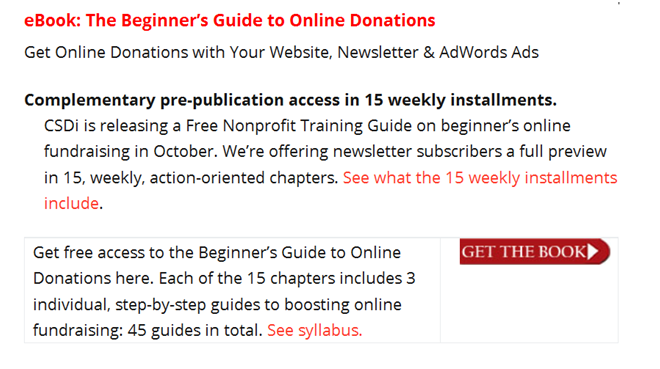
The Beginner’s Guide to Online Donations
Get Online Donations with Your Website, Newsletter & AdWords Ads
Email List Building: signup forms, pop-ups and incentives. Ch. 9
Nonprofits: Email List Building: Learn to design subscription forms, insert pop-up signup forms, and offer signup incentives like a PDF handbook.
 |
The Beginner’s Guide to Online Donations. CSDi is offering a complimentary nonprofit book on online fundraising.
Boost your donations in 14 weeks:  |
|
Each of the 14 chapters include 3 step-by-step guides that lead you in setting up a modern website, launching a donor newsletter program and applying for a $10k/mo Google AdWords Grant. See what the 42 guides include.
|
|
Last week we introduced Chapter 8. Writing a communications calendar and launching a campaign.
Today we are presenting the full version of Chapter 9 on Email List Building.
Chapter 9. Email List Building: signup forms, pop-ups and incentives.
Here is a quick summary of the 4 steps in the Email List Building chapter:
Tab 1. The Importance of Email List Building: an overview.
Tab 2. Guide 25. Developing webpage signup forms linked to your email list building service provider.
Tab 3. Guide 26. Inserting signup popups that convert visitors to subscribers before they leave.
Tab 4. Guide 27. Irresistible incentives to signing up.
Chapter 9 on Email List Building is set-up for you in the 4 tabs just below.
Email List Building: Time Requirement.
- Email List Building Overview: 15 minutes.
- Developing webpage signup forms. 1 Hour.
- Inserting signup popups that capture subscribers. 1 hour.
- Irresistible incentives to signing up. 45 minutes.
Total Time for Chapter 9 Email List Building. Three Hours.
|
Get free access to the Beginner’s Guide to Online Donations here. Each of the 14 chapters includes 3 individual, step-by-step guides to boosting online fundraising: 42 guides in total. See the syllabus.
|
|
Chapter 9: Email List Building is set-up for you in the 4 tabs below.
Links for Email List Building: signup forms, pop-ups and incentives:
CHAPTER 9 Overview. Email List Building using signup forms, pop-ups & free offers.
This week in Chapter 9 we’re going to learn about 1) Developing webpage email list building signup forms. 2) Inserting signup popups that convert visitors to subscribers. And, 3) irresistible incentives to signing up.
Guide 25. Subscriber Information. Collecting subscribers. What information should you ask of a new subscriber?
In the first section of Chapter 9, one of the first decisions that you have to make is to determine what information do you want a subscriber to provide on the subscription form. I mean honestly, is their fax number really necessary?
Guide 26. Forms and Popups. Designing subscription forms and inserting signup popups that convert visitors to subscribers.
Developing webpage email signup forms sounds like a lot of work doesn’t it? But it isn’t really. All you need is an email list building service provider. Popups? All you need is a Sumo wrestler.
Guide 27. Irresistible Incentives. Do you have a free offer for convert visitors into subscribers?
Having a free offer is a great way to get started with email list building. You’ve seen this many times before yourself—you read about an interesting handbook that could be useful to your organization. When you go to the website and click on ‘download the handbook’ you’re sent to a newsletter subscription form.
Get Going on Email List Building!
So now, click on the second tab to learn about what information to collect from subscribers. Click on the third tab to learn how to design subscription forms and how to install popups. And click on the fourth tab to learn how to collect subscribers with irresistible offers.
Next week, in the next chapter (Chapter 10) we’re going to learn how to write subject lines, format newsletters, connect to an actionable landing page and send out a new newsletter!
Enjoy. See you next week.
CHAPTER 9. Email List Building using forms, pop-ups & free offers.
Guide 25 Collecting Subscribers. What information should you ask of a new subscriber?
Email List Building: This week we’re going to look at a couple of different ways of collecting subscriber’s names using simple forms, pop-ups, and free offers.
But one of the first decisions that you have to make is to determine what information do you want a subscriber to provide on the subscription form.
Here is a great article by Peep Laja of Conversion XL on great sign-up forms:
http://conversionxl.com/14-steps-to-building-sign-up-forms-that-convert/
http://conversionxl.com/14-steps-to-building-sign-up-forms-that-convert/
In his 14 steps he gets into a lot of great detail which is really useful, but as this is a Beginner’s Guide let me summarize:
1. Fewer is better. A fewer number of fields is better and leads to more sign-ups. Do you really need their fax number?
2. Sell it. What benefit will they get by signing up? Where is the Social Proof?
https://nonprofit.csd-i.org/subscribe-csdi-newsletter-get-free-beginners-guide/
https://nonprofit.csd-i.org/subscribe-csdi-newsletter-get-free-beginners-guide/
Once you get your forms up and running, you can go back to MailChimp and begin utilizing some of his other suggestions to make them more effective.
So let’s focus on his first two ideas.
What do you need to know? Here are four common informational fields:
1. Email address. The really hard core list building gurus would be happy with an email address—period. Make it as easy as possible for someone to sign up.
1. Email address. The really hard core list building gurus would be happy with an email address—period. Make it as easy as possible for someone to sign up.
2. First name. A first name adds a nice touch. This way, when your newsletter goes out—right at the top it says "Dear Tim." I think it’s a personalization that everybody appreciates. If your nonprofit specializes in working with homeless mothers, this can also be a way to see if a guy is signing up without having to ask additional questions.
3. Last name. I would say last names are optional. I like asking for people’s last names. It allows me to see if someone’s signed up for the email twice, or to see if a person who’s enrolled in a course is also signed up for our newsletter—that sort of thing. On the other hand, you can find out their last name later. If someone wants to make a donation to your organization, volunteer, or sign up for your golf tournament—you’ll find out their last name then.
4. Specialty information. There might be a reason for you to have a special piece of information about a newsletter subscriber. This largely has to do with tailoring your communications to them. You don’t necessarily want to be sending requests for a donation to a class of high school kids whovolunteered for you in the fall clean-up.
Segmentation. This is called segmenting. So you might find that you have several different mailing lists. One for donors, one for volunteers, and one for clients. You could send them specialized newsletters that they might appreciate more than a general newsletter. So it could be good to have a field where they could express their level of interest: supporter, volunteer, client, just curious.
You might have geographic segmentation. So perhaps you have one food bank in downtown San Francisco, and a second food bank in Berkeley. The donors might be the same for those two locations, but the volunteers and the clients might be completely different groups because of the locations of the food banks. So in your case it might be good to ask for a city or county.
At CSDi we ask for a subscriber’s country. And the reason is quite simple. We provide training in international development, and also training for North American nonprofits. Two completely different programs—so we need to know where a person comes from so that we can make sure they receive a newsletter tailored to their interests.
Your nonprofit is unique. A simple email address might work just fine for you.
On the other hand because of your specialization (medical clinic) you may need a few more pieces of specialty information. Drop down lists in a form field can help you by categorizing answers so they are more consistent—and also speed things up for the reader. Auto-fill form fields are even better.
In conclusion, I would suggest keeping the sign-up form as simple as possible so you don’t scare anybody away, but thinking carefully about specialized information that will help you segment your list.
Copyright © 2016, Tim Magee
CHAPTER 9. Email List Building using forms, pop-ups & free offers.
Guide 26 Popups: Using forms and popups as a signup conversion technique with new visitors.
Email List Building: How to set up a subscription form with Mail Chimp on your website.
Signup forms are linked to a list. So login in to your MailChimp account:
https://login.mailchimp.com/
https://login.mailchimp.com/
Under "Import your list" click on "View lists." You will see the lists you already have.
In the upper left click on "Create list."
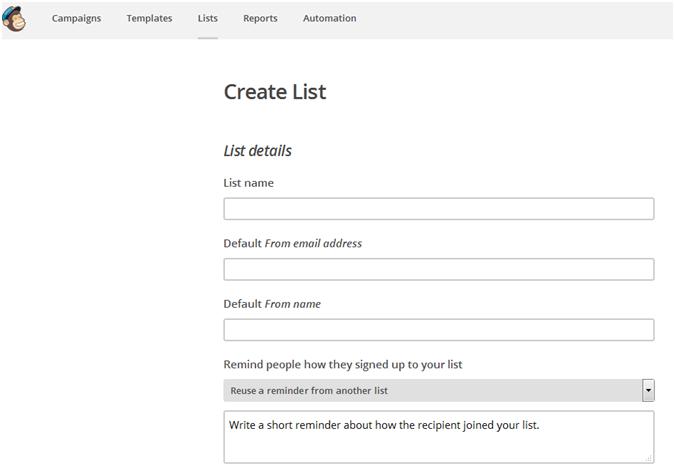
To the form add this information:
- List name
- Default from email address
- Default From Name
- Remind people how they signed up to your list
Click on save.
You will come to a page called "List name and campaign defaults" which gives you the opportunity to fill in a little more information on your subscription notification for new subscribers. You can just use the same "Default email address" from the last form.
Click on save.
You will also receive a List ID number.
To Create a Signup list:
After saving the form information for the new list, click on "Signup forms."
After saving the form information for the new list, click on "Signup forms."

Click on "General Forms. You will see at the very top of the page that you are still in the list that you just created. For example, the top of my page says:
Nonprofit Newsletter from CSDi
Nonprofit Newsletter from CSDi
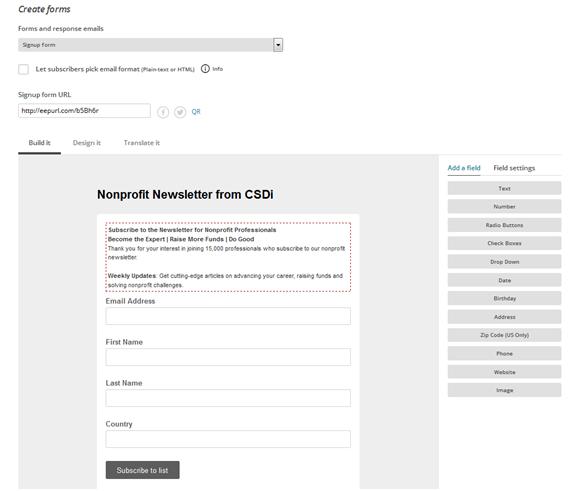
The first thing to do is to write a short note. My example:
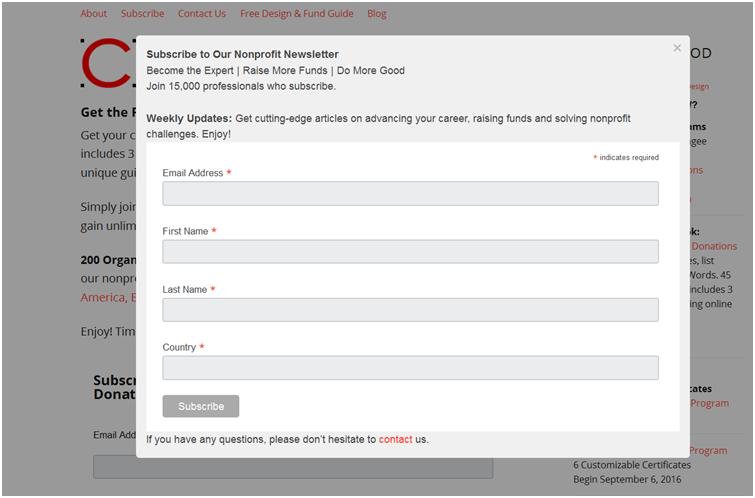
Subscribe to the Newsletter for Nonprofit Professionals
Become the Expert | Raise More Funds | Do More Good
Thank you for your interest in joining 15,000 professionals who subscribe to our nonprofit newsletter.
Weekly Updates: Get articles that provide cutting-edge information that leads you in advancing your career, raising funds and solving nonprofit challenges.
Enjoy! Tim Magee, Executive Director
Save it.
Then, MailChimp gives you 3 initial fields:
Email Address
First Name
Last Name
Email Address
First Name
Last Name
And a Subscribe button.
In the left sidebar are other fields that you can add.
Installing the form:
Option 1. You will get a "Signup form URL" in this ‘create a form page’ you are on. You can copy it and use it as the link for your sign up buttons on your website. When people click on your sign up button – they will be sent to MailChimp to fill out the information. And then they will be subscribed.
Option 1. You will get a "Signup form URL" in this ‘create a form page’ you are on. You can copy it and use it as the link for your sign up buttons on your website. When people click on your sign up button – they will be sent to MailChimp to fill out the information. And then they will be subscribed.
Option 2.
Open up an existing subscribe page at your website, or, create a new blank subscribe page on your website.
Open up an existing subscribe page at your website, or, create a new blank subscribe page on your website.
Paste the "Subscribe note" from your signup form into your blank page (whatever way you like doing it so that it looks good):
Subscribe to the Newsletter for Nonprofit Professionals
Thank you for your interest in joining 15,000 professionals who subscribe to our nonprofit newsletter.
Weekly Updates: Get articles that provide cutting-edge information that leads you in advancing your career, raising funds and solving nonprofit challenges.
Enjoy! Tim Magee, Executive Director
Now, go back to "Signup forms" (in the upper horizontal menu" and click on "Embedded forms." You will see at the very top of the page that you are still in the list that you just created. For example, the top of my page says:
Nonprofit Newsletter from CSDi
Nonprofit Newsletter from CSDi
Open up your subscribe page at your website in HTML edit mode. Or, create new subscribe page on your website and open it up in HTML edit mode.
In the MailChimp "Embedded forms" where it says "Copy/paste onto your site" click on the html code and copy it (control ‘C’).
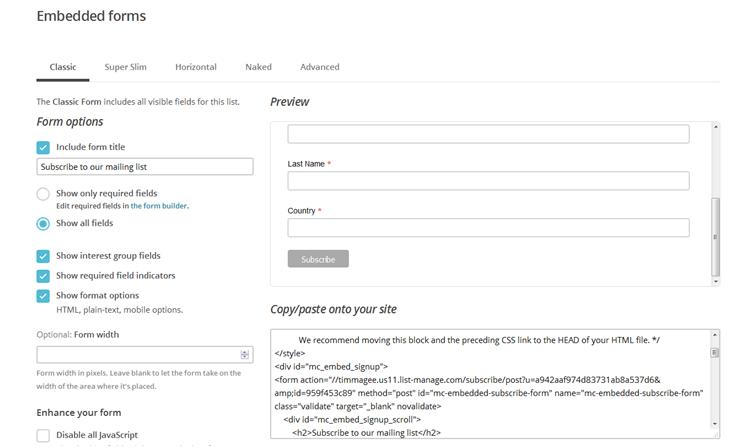
Paste it into your subscribe page on your website in the HTML edit window just below your "Subscribe note" and save it. You can see an example here:
https://nonprofit.csd-i.org/subscribe-to-csdi-nonprofit-newsletter/
https://nonprofit.csd-i.org/subscribe-to-csdi-nonprofit-newsletter/

The upper half is a normal content in the webpage. The lower half is Mailchimp’s embedded form.
Opt-in confirmation:
Back at General Forms, under create forms, in the dropdown list click on "opt-in confirmation email."
Back at General Forms, under create forms, in the dropdown list click on "opt-in confirmation email."
In the form you can personalize what MailChimp has written. For example:
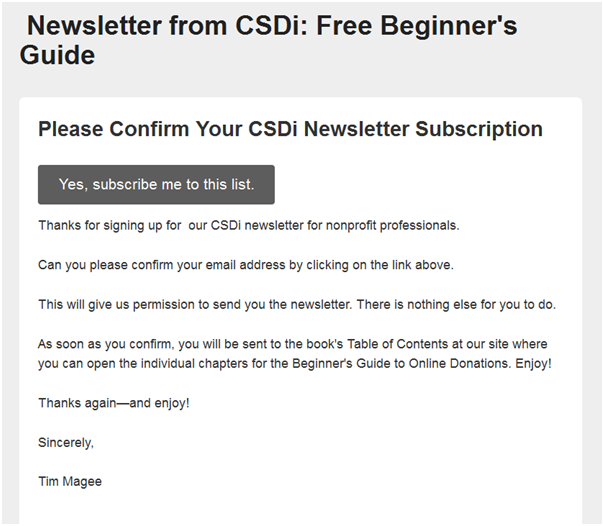
“Please Confirm Your CSDi Newsletter Subscription
Thanks for signing up for our CSDi newsletter for nonprofit professionals.
Can you please confirm your email address by clicking on the link above.
This will give us permission to send you the newsletter. There is nothing else for you to do.
Thanks again—and enjoy!
Sincerely,
Tim Magee”
Now go back to the top drop down menu and click on "Confirmation ‘thank you’ page."
If after confirming their subscription, you would like your new subscriber to receive a thank you note, just edit the one in this form.
If that seems like too many emails, and you would like them to return to your site, enter one of your webpages into the cell below where it says: "Instead of showing this thank you page, send subscribers to another URL."
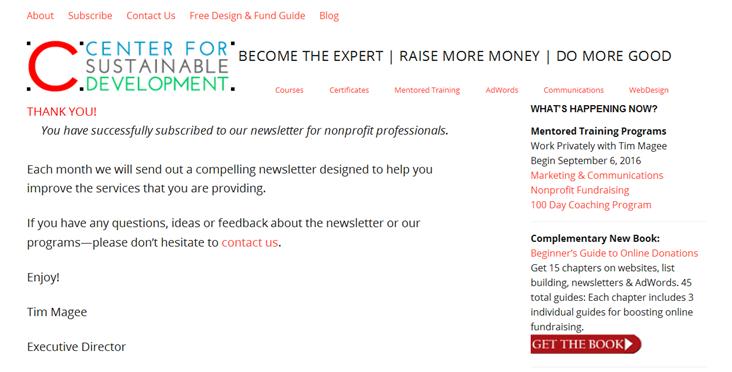
This can be to a landing page where maybe they will donate—or it can be to a simple thank you page like this one:
https://nonprofit.csd-i.org/thank-you-for-subscribing-to-nonprofit-newsletter/
https://nonprofit.csd-i.org/thank-you-for-subscribing-to-nonprofit-newsletter/
Don’t close the MailChimp windows yet.
Double Check.
OK! You have just complete setting up a legitimate opt-in subscription form on your website. Congratulations!
OK! You have just complete setting up a legitimate opt-in subscription form on your website. Congratulations!
Just double check that it works and that it looks good.
Go to your subscription page and subscribe! See what happens.
If it worked, you should get a confirmation email. Does it look OK? Is it clear?
If so—great! If not, while your MailChimp form is still open you can make edits and corrections.
Good Job!
The final proof will be when you get a "New Subscriber" notification from MailChimp with your name.
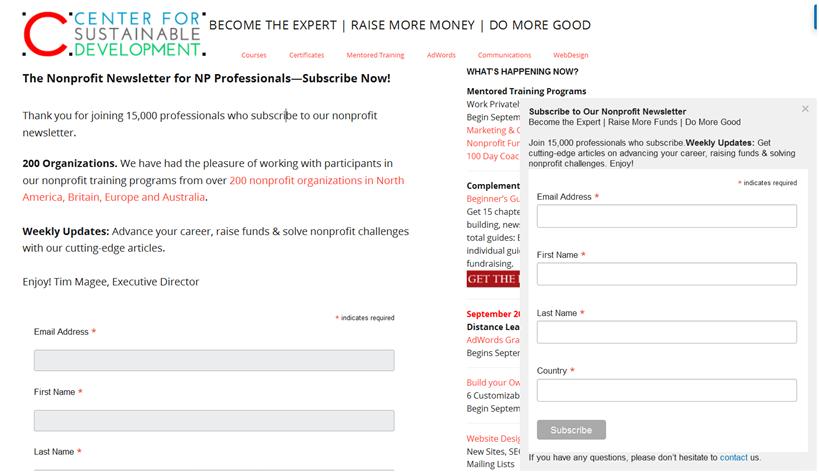
How to Set up Pop-Ups for Newsletters on Your Website.
Now that we’ve worked so hard getting people to visit your website, we need to make sure that qualified visitors sign up for your email list.
Now that we’ve worked so hard getting people to visit your website, we need to make sure that qualified visitors sign up for your email list.
Not many people randomly sign up for newsletters after having landed at a website. They need some encouragement.
Two of the most effective things that you can do are to have pop-up subscription forms and/or to offer something for free.
You might personally find pop-up subscription forms annoying, but they have proven to be highly effective. Plus, you can make not too terribly obnoxious.
Much like website companies, there are hundreds of pop-up organizations out there. I’m going to introduce you today to one called SumoMe. It’s free, flexible, and fairly easy to set up.
Step 1. In WordPress, click on install new plug-ins and search for SumoMe. Install it, and activate it.
Step 2. You will find that there is a new blue ‘thingy’ in the top right of your WordPress site. It just looks like a small blue line but when you hover over it a blue crown appears: click on it. Then register with SumoMe.
Step 3. After signing in you’ll be taken to the Sumo Store. They have a number of tools that you can take advantage of. But today we’re focusing on pop-ups. They have two kinds of pop-ups: List Builder and Scroll Box.
List Builder causes a pop-up to appear on the visitor’s screen when they do one of several actions—such as move their mouse cursor to the top right like they’re going to "X" out of your site. You can choose which actions will activate the pop-up. You can customize the pop-ups with graphic tools and make them different sizes as well.
Scroll Box works like this: when somebody begins reading one of your webpages, as they scroll down and begin approaching the bottom of the page, Scroll Box will activate a pop-up that slides in from the side like this:
Step 4. When you click on List Builder or Scroll Box you’ll be taken to a page where you can set up your pop-up.
Off in the left sidebar, click on "Behavior." This begins the process of letting Sumo know when to activate the pop-up.
Under "Services" you can select the email list building service provider that you use—for our example we would select MailChimp. This means that Sumo isn’t actually collecting names, it’s simply providing the pop-up—and MailChimp is doing collection of names.
Under "Advanced" you can determine the size of the pop-up. But this is also where you paste in your subscription form.
Do you remember how earlier in this week’s chapter we went into MailChimp, clicked on "Sign-Up Forms", and then "Embedded Forms" and copied the HTML code for your sign-up form and pasted the code into your website’s subscription page?
We’re going to do the same thing here with Sumo.
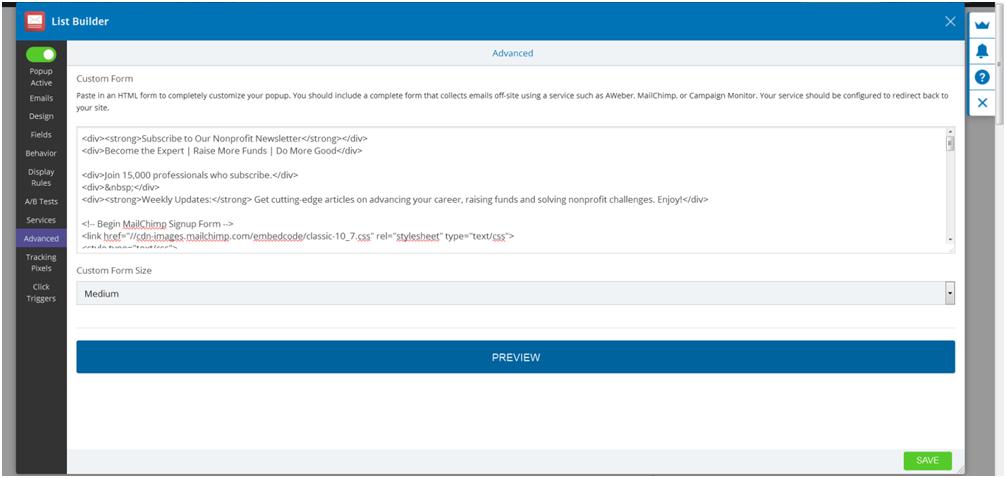
I want to keep track of how I’m getting sign-ups, so I’ve actually created a new list in MailChimp called Scroll Box. That way when someone subscribes to the newsletter through the services of a pop-up it shows up in this mailing list and so I can see how effective it’s being.
After you’ve created the new list and it’s sign-up form—exactly like we did in the first part of this week’s exercise, you can paste the Embedded Form’s HTML into this “Advanced” location in SumoMe—and you’re done!
Please Note: You don’t need to create a new list from scratch: you can simply replicate the list that you made in the first part of this chapter and just save it under a new list name. You can do that in one minute and copy the HTML from embedded forms and paste the code right into SumoMe.
Once your pop-up is working on your website you can fine tune it to make it bigger, smaller, more colorful, less colorful and you can even change the copy back in MailChimp if you don’t like what it says.
CHAPTER 9. Email List Building using forms, pop-ups & free offers.
Guide 27 Incentives: Email List Building: Do you have a free offer? Compiling an e-book to entice new subscribers.
Having a free offer is a great way of starting your email list building project. You’ve seen this many times before yourself—you read about an interesting handbook that could be useful to your organization. When you go to the website and click on ‘download the handbook’ you’re sent to a newsletter subscription form.
So you need to make the decision whether to sign up for the newsletter and download the handbook or not. Chances are, if the handbook is indeed interesting to you, you might consider receiving the newsletter from this organization if they provide other valuable resources for you.
So to do the same thing. You need six things—many of which you do once and use over and over again:
- A resource that your target audience would be interested in having access to.
- A landing page which tells visitors about the resource and links to the subscription page.
- A subscription page with a subscription form.
- A subscription form specific to that resource.
- A subscription thank you letter/confirmation which gives a subscriber a link to the resource.
- A page on your website with a link to download a PDF document or a page your on your website with links to book chapters.
STEP 1. The Resource.
The resource can be almost anything. If you are just getting started with the free offer, keep it simple—we don’t need to have you write a complete book here.
The resource can be almost anything. If you are just getting started with the free offer, keep it simple—we don’t need to have you write a complete book here.
Be creative. This could be as simple as a PDF handbook that you saw (that someone else wrote) on "How to Help the Homeless." You’ve downloaded it yourself to your website and you can make it available to other people with a subscription to your newsletter.
It could be a report that your organization has put together—that would be interesting to potential donors and volunteers.
It could be a page of resources that are in the form of links. "The 20 Best Resources on Feeding the Poor." You simply collect over time a list of resources that are useful to you, post them to a website, and give your site visitors access to the list of resources with the subscription.
So all you need is a single, short webpage, with either a 1) link to a webpage, 2) a page with a list of resources, or a link to a downloadable PDF.
STEP 2 . The Landing Page
This landing page will feature your resource. For example, it could be a blog post about the resource. But this landing page will have a subscription link. It might be a simple form on the landing page that says ‘subscribe here to download this great resource,’ or it could be a link to a subscription form which says the same thing.
This landing page will feature your resource. For example, it could be a blog post about the resource. But this landing page will have a subscription link. It might be a simple form on the landing page that says ‘subscribe here to download this great resource,’ or it could be a link to a subscription form which says the same thing.
The landing page can also tell people how the process works: "Subscribe to our monthly newsletter and we will send you a confirmation email immediately to your inbox with the download link."
How to do this:
Create a new webpage called something like:
Nonprofit Marketing Plan: Set a goal, target a market, tell your story.
Create a new webpage called something like:
Nonprofit Marketing Plan: Set a goal, target a market, tell your story.
You can see the real page here:
https://nonprofit.csd-i.org/nonprofit-marketing-plan-goal-target-market-tell-story/
https://nonprofit.csd-i.org/nonprofit-marketing-plan-goal-target-market-tell-story/
This can be a webpage which you have planned to use in your 12-month communications plan on a compelling topic.
And then, above the fold, you give readers the option to download or link to the resource: a link to a page or to a PDF.
So, write your content. In the middle, you can have something like this above the fold which will encourage them to go to your subscription page to subscribe and receive the resource.
Write something like this in your webpage:
You can see a real example here:
https://nonprofit.csd-i.org/online-donations-with-your-website-newsletter-adwords/
https://nonprofit.csd-i.org/online-donations-with-your-website-newsletter-adwords/
To attract attention, this could be indented, it could be in smaller print, it could be in a box on your page.
Just below it, you can carry on with your landing page’s subject.
STEP 3. Subscription page.
When they click on "Get the Book" they will be taken to a much simpler, shorter landing page which is nothing more than a subscription page. You don’t want to have links to other pages on this page—the goal is to get them to subscribe. Period.
When they click on "Get the Book" they will be taken to a much simpler, shorter landing page which is nothing more than a subscription page. You don’t want to have links to other pages on this page—the goal is to get them to subscribe. Period.
You could say something like this:
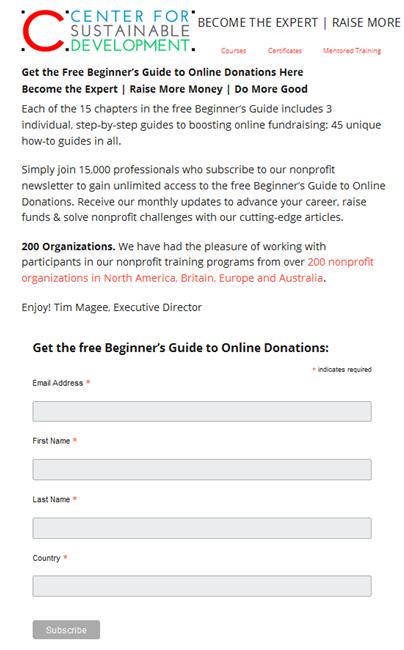
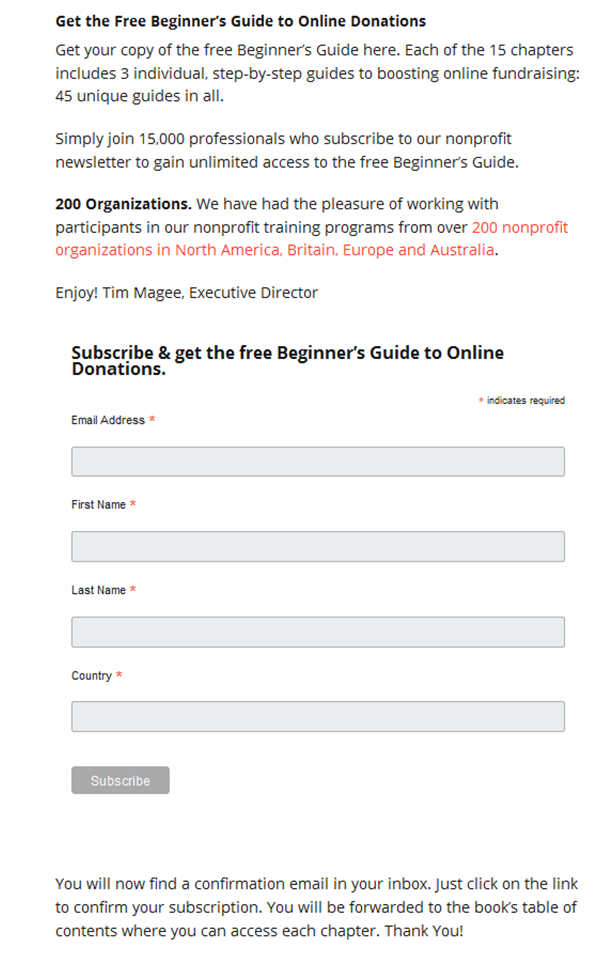
Get the Free Beginner’s Guide to Online Donations
Get your copy of the free Beginner’s Guide here. Each of the 15 chapters includes 3 individual, step-by-step guides to boosting online fundraising: 45 unique guides in all.
[SOCIAL PROOF]
Simply join 15,000 professionals who subscribe to our nonprofit newsletter to gain unlimited access to the free Beginner’s Guide.
Simply join 15,000 professionals who subscribe to our nonprofit newsletter to gain unlimited access to the free Beginner’s Guide.
200 Organizations. We have had the pleasure of working with participants in our nonprofit training programs from over 200 nonprofit organizations in North America, Britain, Europe and Australia.
Enjoy! Tim Magee, Executive Director
STEP 4. The MailChimp Subscription Form.
The subscription form for each free offer that you have will be unique to that offer.
The subscription form for each free offer that you have will be unique to that offer.
However, that said, you may only have one offer, with one unique subscription form, that 20 of your different webpages link to. So it’s not as if you’re going to be creating a unique subscription form every week.
The basic MailChimp form itself can be copied and pasted from another one of your standard forms—and then you can do some simple editing. The only difference is that we’re going to write an automated thank you note and confirmation note that MailChimp sends out.
HOW TO DO THIS
Much like we did in the previous assignment, log on to your MailChimp account. At the very top click on "Lists."
Much like we did in the previous assignment, log on to your MailChimp account. At the very top click on "Lists."
Pick a list that you could copy. Just to the right of the list is a drop-down menu with "replicate" in it.
"Replicate" the list and simply, change the name to reflect the name of your free offer.
Then, follow the directions for embedded forms in the previous lesson. You will see that in the embedded form page, your new subscription form can be a copy from the previous one—so there won’t be too many changes for you to make.
You can then simply copy the HTML for the embedded form and paste it into your site as before.
Just below the MailChimp form, on your Subscription page, write in something like this:
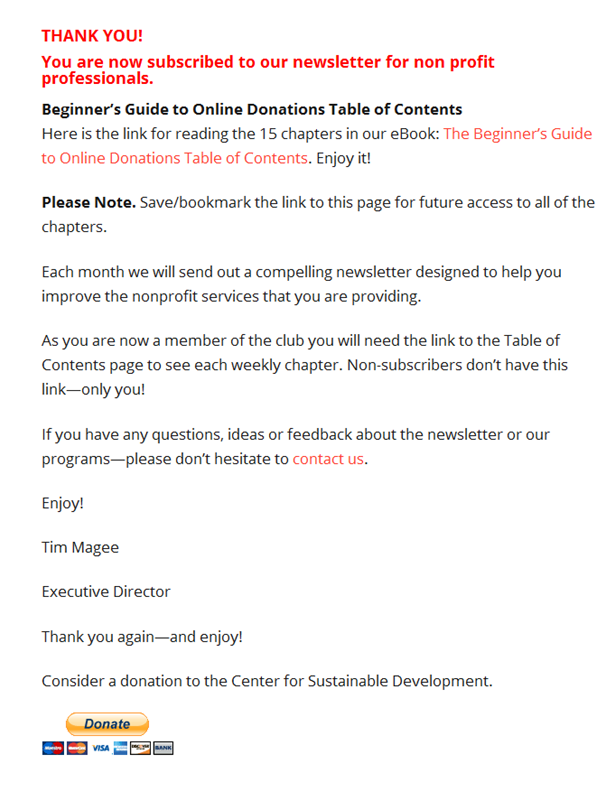
You will now find a confirmation email in your inbox. Just click on the link to confirm your subscription. You will be forwarded to the book’s table of contents where you can access each chapter. Thank You!
You will now find a confirmation email in your inbox. Just click on the link to confirm your subscription. You will be forwarded to the book’s table of contents where you can access each chapter. Thank You!
When you are done, your Subscription page will look like this:
You can see the real page here:
https://nonprofit.csd-i.org/subscribe-csdi-newsletter-get-free-beginners-guide/
https://nonprofit.csd-i.org/subscribe-csdi-newsletter-get-free-beginners-guide/
After they click "Subscribe" MailChimp will automatically insert the message:
Almost finished… We need to confirm your email address. To complete the subscription process, please click the link in the email we just sent you.
STEP 5. The MailChimp thank you note/confirmation email.
After subscribing, MailChimp will send the new subscriber an automated thank you note/please confirm email something like this:
After subscribing, MailChimp will send the new subscriber an automated thank you note/please confirm email something like this:
How to do this:
Now go back to "General Forms" and the drop-down menu beneath "Create Forms," click on ‘Opt-in confirmation mail’ and paste in something like the message above right into the box.
Now go back to "General Forms" and the drop-down menu beneath "Create Forms," click on ‘Opt-in confirmation mail’ and paste in something like the message above right into the box.
Save it.
When new subscribers click on the "Yes, subscribe me to the list" link, MailChimp accepts their confirmation (i.e. captures the email address) and automatically routes them to a page in your website.
It would route them to the page for accessing the offer—whether it is a link to download a PDF document or a page on your site.
In today’s example it is a webpage rather than a live link to a PDF. The final webpage with the information they need to access the resource could look like this real page:
https://nonprofit.csd-i.org/free-beginners-guide-subscription-thank-you/
https://nonprofit.csd-i.org/free-beginners-guide-subscription-thank-you/
Some background thoughts:
EXTRANEOUS INFORMATION: This may be a bit advanced, but it might be well worth considering here.
If you’re considering setting up an AdWords grant, then it might be worth having the confirmation go to a centralized page with a link to the resource. The reason for this is that AdWords has what’s known as "conversion tracking." If someone signs up for your newsletter to get access to a resource based upon an AdWords ad, AdWords will spot this. If you’re a small shop, it may be simpler for you to have one page that a number of people go to access a specific resource.
These subscribers will each show up in your AdWords account as a conversion. You can see which ad and which keyword triggered this conversion—consequently you don’t need to have a separate confirmation page for each ad—perhaps one will do. We will cover this in greater detail in chapter 14, but for now just keep it simple.
How to do this:
Now go back to "General Forms" and the drop-down menu and click on "Confirmation ‘thank you’ page."
Now go back to "General Forms" and the drop-down menu and click on "Confirmation ‘thank you’ page."
At the very top it says:
"Instead of showing this thank you page, send subscribers to another URL"
"Instead of showing this thank you page, send subscribers to another URL"
Simply paste in the URL for the page (you will need to write this web page) where can access the resource (the page just below in Number 5). And you’re done.
Today’s example of the page you could write called "Free Beginner’s Guide Subscription: Thank You!"
https://nonprofit.csd-i.org/free-beginners-guide-subscription-thank-you/
https://nonprofit.csd-i.org/free-beginners-guide-subscription-thank-you/
Save it.
This links to this page (this is the page that caused them to subscribe in order to gain access to):

The beauty of this system is that the five pages described above are all automatically linked together and can be copied and pasted from one MailChimp subscription form to another, and from one of your webpages to another—so there really isn’t a lot of work.
Now, I would do what you did in the previous assignment and double check this whole system. Just follow your own directions to sign yourself up for a subscription (or a donation or volunteer position) and go through the different steps to make sure that the whole process works.
Copyright © 2016, Tim Magee
Two great resources for this month:
Here is a great article by Peep Laja of Conversion XL on great sign-up forms:
http://conversionxl.com/14-steps-to-building-sign-up-forms-that-convert/
http://conversionxl.com/14-steps-to-building-sign-up-forms-that-convert/
Welcome to The Smart Marketer’s Landing Page Conversion Course
http://thelandingpagecourse.com/landing-page-101-intro/
http://thelandingpagecourse.com/landing-page-101-intro/
In the next chapter (Chapter 10) we’re going to learn how to write subject lines, format newsletters, connect to an actionable landing page and send out a new newsletter!
Enjoy Email List Building! See you next week.
Want to enjoy the Chapter 9 Email List Building learning process with a live teacher? See the online, teacher-led course behind this chapter.
|
Get free access to the Beginner’s Guide to Online Donations here. Each of the 14 chapters includes 3 individual, step-by-step guides to boosting online fundraising: 42 guides in total. See the syllabus.
|
|
Copyright © 2016, Tim Magee